Github:https://github.com/Kedreamix/pytorch-cppcuda-tutorial
前馈知识:Kedreamix:CUDA编程学习:自定义Pytorch+cpp/cuda extension
接下来再进行一个实践,根据pytorch官网的一个应用扩展文档 来一起来实现这个LLTM的神经网络的实现,这是官方对应的代码 https://github.com/pytorch/extension-cpp。
首先介绍一下,假设有一种新的循环单元,这个循环单元类似于 LSTM,但不同之处在于它没有遗忘门,并使用指数线性单元 (ELU ) 作为其内部激活函数。因为这个单元能够记忆很久,我们称之为 LLTM,或 Long-Long-Term-Memory 单元。
LLTM 与普通 LSTM 的两种不同之处非常重要,以至于我们无法为我们的目的配置 PyTorch 的 LSTM 算子,因此我们必须创建一个自定义算子。第一个也是最简单的方法——可能在所有情况下都是很好的第一步——是用 Python 在普通的 PyTorch 中实现我们想要的功能。为此,我们需要继承 torch.nn.Module 并实现 LLTM 的 forward。
Pytorch普通实现 接下来我们就用普通的pytorch对其进行实现LLTM,具体代码如下
1
2
3
4
5
6
7
8
9
10
11
12
13
14
15
16
17
18
19
20
21
22
23
24
25
26
27
28
29
30
31
32
33
34
35
class LLTM (torch.nn.Module): def __init__ (self, input_features, state_size ): super (LLTM, self).__init__() self.input_features = input_features self.state_size = state_size self.weights = torch.nn.Parameter( torch.empty(3 * state_size, input_features + state_size)) self.bias = torch.nn.Parameter(torch.empty(3 * state_size)) self.reset_parameters() def reset_parameters (self ): """ 重置模型参数的方法。 初始化权重和偏差的值,使用均匀分布和标准差进行初始化。 """ stdv = 1.0 / math.sqrt(self.state_size) for weight in self.parameters(): weight.data.uniform_(-stdv, +stdv) def forward (self, input , state ): old_h, old_cell = state X = torch.cat([old_h, input ], dim=1 ) gate_weights = F.linear(X, self.weights, self.bias) gates = gate_weights.chunk(3 , dim=1 ) input_gate = torch.sigmoid(gates[0 ]) output_gate = torch.sigmoid(gates[1 ]) candidate_cell = F.elu(gates[2 ]) new_cell = old_cell + candidate_cell * input_gate new_h = torch.tanh(new_cell) * output_gate return new_h, new_cell
Python扩展实现 我们在大多数的时候,都是用上述的方法进行对Pytorch进行扩展,因为 PyTorch 对 CPU 和 GPU 的操作实现了高度优化,并由 NVIDIA cuDNN 、Intel MKL 或 NNPACK 等库提供支持。因此,通常情况下,上述的PyTorch代码已经足够快速。
然而,在某些情况下,还有进一步提升性能的空间。这是因为PyTorch可能不了解我们实现的特定算法,它只知道我们使用的各种操作。因此,它可能会逐个执行这些操作的内核(可能涉及启动CUDA内核),这会导致累积的开销变得很大。此外,Python本身也存在一些速度限制。
因此,一种明显的加速方法是使用C++(或CUDA)对部分代码进行重写,并将特定的操作组合起来。组合意味着将许多函数的实现合并为一个函数,这样可以启动较少的内核,并且可以通过提高全局数据流的可见性来执行其他优化。
接下来,我们将分别使用Python,C++,Pytorch 扩展来实现LLTM(Long Long-Term Memory)的组合版本。我们将从使用纯C++编写它开始,使用ATen 库,该库为PyTorch的大部分后端提供支持。然后,我们将通过将模型的部分移动到CUDA内核中,以利用GPU提供的大规模并行性,进一步提高速度。
在上述的代码中,为了后续对写C++扩展有一个更好的理解,所以再加上一部分首先实现反向传播的代码。所以我们需要手写我们对应函数出现的微分,这里面我们就需要先计算基础函数的微分函数,分别是的d_sigmoid,d_tanh和d_elu,后续可以对其进行复用。
在这一部分的代码中,结果实际上的方式和上面代码是一样的,主要是就是独立实现了一下对应的反向传播部分,方便后续进行训练的反向传播的CUDA编写,并且让大家也更加理解一下对应底层的C++和CUDA反向传播的代码的编写原理。
在前面我们有介绍过ctx可以保存我们反向传播需要的参数,所以这里使用了ctx.save_for_backward(X, weights, input_gate, output_gate, old_cell,new_cell, candidate_cell, gate_weights),最后返回了两个值,分别是new_h, new_cell,并且这两部分我们也需要在反向传播中传入两个参数进行求微分,在forward函数中,我们有四个参数input, weights, bias, old_h, old_cell,所以反向传播的最后返回值也分别是d_input, d_weights, d_bias, d_old_h, d_old_cell进行一一对应。
基础函数 1 2 3 4 5 6 7 8 9 10 11 12 13 14 15 16 17 18 19 20 21 22 23 24 25 26 27 28 29 30 31 32 33 34 35 36 37 38 39 40 41 42 43 44 45 46 47 import mathimport torchfrom torch import nnimport torch.nn.functional as Fdef d_sigmoid (z ): """ 计算sigmoid函数的导数 参数: z (tensor): 输入张量 返回值: d_sigmoid (tensor): sigmoid函数的导数张量 """ s = torch.sigmoid(z) return (1 - s) * s def d_tanh (z ): """ 计算tanh函数的导数 参数: z (tensor): 输入张量 返回值: d_tanh (tensor): tanh函数的导数张量 """ t = torch.tanh(z) return 1 - (t * t) def d_elu (z, alpha=1.0 ): """ 计算ELU函数的导数 参数: z (tensor): 输入张量 alpha (float): ELU函数的alpha参数,默认为1.0 返回值: d_elu (tensor): ELU函数的导数张量 """ e = z.exp() mask = (alpha * (e - 1 )) < 0 return (z > 0 ).type_as(z) + mask.type_as(z) * (alpha * e)
前向和反向传播 1 2 3 4 5 6 7 8 9 10 11 12 13 14 15 16 17 18 19 20 21 22 23 24 25 26 27 28 29 30 31 32 33 34 35 36 37 38 39 40 41 42 43 44 45 46 47 48 49 50 51 52 53 54 55 56 57 58 59 60 61 62 63 64 65 66 67 68 69 70 71 72 73 74 75 76 77 78 79 80 class LLTMPythonFunction (torch.autograd.Function): @staticmethod def forward (ctx, input , weights, bias, old_h, old_cell ): X = torch.cat([old_h, input ], dim=1 ) gate_weights = F.linear(X, weights, bias) gates = gate_weights.chunk(3 , dim=1 ) input_gate = torch.sigmoid(gates[0 ]) output_gate = torch.sigmoid(gates[1 ]) candidate_cell = F.elu(gates[2 ]) new_cell = old_cell + candidate_cell * input_gate new_h = torch.tanh(new_cell) * output_gate ctx.save_for_backward(X, weights, input_gate, output_gate, old_cell, new_cell, candidate_cell, gate_weights) return new_h, new_cell @staticmethod def backward (ctx, grad_h, grad_cell ): X, weights, input_gate, output_gate, old_cell = ctx.saved_variables[:5 ] new_cell, candidate_cell, gate_weights = ctx.saved_variables[5 :] d_input = d_weights = d_bias = d_old_h = d_old_cell = None d_output_gate = torch.tanh(new_cell) * grad_h d_tanh_new_cell = output_gate * grad_h d_new_cell = d_tanh(new_cell) * d_tanh_new_cell + grad_cell d_old_cell = d_new_cell d_candidate_cell = input_gate * d_new_cell d_input_gate = candidate_cell * d_new_cell gates = gate_weights.chunk(3 , dim=1 ) d_input_gate *= d_sigmoid(gates[0 ]) d_output_gate *= d_sigmoid(gates[1 ]) d_candidate_cell *= d_elu(gates[2 ]) d_gates = torch.cat( [d_input_gate, d_output_gate, d_candidate_cell], dim=1 ) if ctx.needs_input_grad[1 ]: d_weights = d_gates.t().mm(X) if ctx.needs_input_grad[2 ]: d_bias = d_gates.sum (dim=0 , keepdim=True ) if ctx.needs_input_grad[3 ] or ctx.needs_input_grad[4 ]: d_X = d_gates.mm(weights) state_size = grad_h.shape[1 ] d_old_h, d_input = d_X[:, :state_size], d_X[:, state_size:] return d_input, d_weights, d_bias, d_old_h, d_old_cell class LLTM (nn.Module): def __init__ (self, input_features, state_size ): super (LLTMPython, self).__init__() self.input_features = input_features self.state_size = state_size self.weights = nn.Parameter( torch.Tensor(3 * state_size, input_features + state_size)) self.bias = nn.Parameter(torch.Tensor(1 , 3 * state_size)) self.reset_parameters() def reset_parameters (self ): stdv = 1.0 / math.sqrt(self.state_size) for weight in self.parameters(): weight.data.uniform_(-stdv, +stdv) def forward (self, input , state ): return LLTMPythonFunction.apply(input , self.weights, self.bias, *state)
时间效率比较 实现完成以后可以简单进行一下测试两者forward和backward的时间,比较一下使用Pytorch的自动求导比较快,还是我们自己独立编写一个前向反向传播的函数比较快。
1 2 3 4 5 6 7 8 9 10 11 12 13 14 15 16 17 18 19 20 21 22 23 24 25 26 27 28 29 30 31 32 33 34 35 36 37 38 39 40 41 42 43 44 45 46 import torchcuda_device = torch.device("cuda" ) batch_size = 16 input_features = 32 state_size = 128 X = torch.randn(batch_size, input_features, device=cuda_device, dtype=torch.float32) h = torch.randn(batch_size, state_size, device=cuda_device, dtype=torch.float32) C = torch.randn(batch_size, state_size, device=cuda_device, dtype=torch.float32) rnn = LLTMPython(input_features, state_size).to(cuda_device) forward = 0 backward = 0 n = 100 for _ in range (n): start = time.time() new_h, new_C = rnn(X, (h, C)) torch.cuda.synchronize() forward += time.time() - start start = time.time() (new_h.sum () + new_C.sum ()).backward() torch.cuda.synchronize() backward += time.time() - start print ('Forward: {:.10f} s | Backward {:.10f} s' .format (forward / n, backward / n))rnn = LLTM(input_features, state_size).to(cuda_device) forward = 0 backward = 0 for _ in range (n): start = time.time() new_h, new_C = rnn(X, (h, C)) torch.cuda.synchronize() forward += time.time() - start start = time.time() (new_h.sum () + new_C.sum ()).backward() torch.cuda.synchronize() backward += time.time() - start print ('Forward: {:.10f} s | Backward {:.10f} s' .format (forward / n, backward / n))
1 2 Forward: 0.0012168598 s | Backward 0.0008872311 s Forward: 0.0002657304 s | Backward 0.0004498205 s
从前向和反向的时间比较来看,我们的自实现方法在性能上表现较差,相较于PyTorch的默认自动求导机制。尽管前向传播速度的提升并不明显,这可能表明PyTorch的自动求导机制在某些方面确实具有强大的优势。我们的手动实现可能存在一些效率方面的不足,导致性能不如PyTorch默认方式高效。虽然重新编写前向传播和反向传播是提升训练速度的一种尝试,但我们需要进一步优化以确保其性能与PyTorch默认机制相媲美。在反向传播方面,可能需要考虑使用C++扩展和CUDA扩展来提高效率。
C++扩展实现 接下来,我们将使用C++扩展来实现LLTM(Long Long-Term Memory)的组合版本。我们将从使用纯C++编写它开始,使用ATen 库,在代码中表现为torch/extension.h,该库为PyTorch的大部分后端提供支持。
ATen库是用于张量计算的主要API,
pybind11,是为C++代码创建Python绑定的方式
管理ATen和pybind11之间交互细节的头文件
PyTorch的张量和变量接口是从ATen库自动生成的,因此几乎可以将Python实现1:1转换为C++。所有计算的主要数据类型将是torch::Tensor。
基础函数 对于C++的部分来说,我们首先需要对里面的函数进行重写一遍,利用C++的方式对来进行重写,这样进行计算的时候,程序就会通过C++来计算而不是Python来计算,这样就提高了效率和速度,首先主要是计算基础函数的微分函数,分别是的d_sigmoid,d_tanh和d_elu,主要是通过C++来进行编写。PyTorch的张量和变量接口是从ATen库自动生成的,因此几乎可以将Python实现1:1转换为C++。所有计算的主要数据类型将是torch::Tensor。
1 2 3 4 5 6 7 8 9 10 11 12 13 14 15 16 17 18 19 20 #include <torch/extension.h> #include <vector> #include <iostream> torch::Tensor d_sigmoid (torch::Tensor z) { auto s = torch::sigmoid (z); return (1 - s) * s; } torch::Tensor d_tanh (torch::Tensor z) { return 1 - z.tanh ().pow (2 ); } torch::Tensor d_elu (torch::Tensor z, torch::Scalar alpha = 1.0 ) { auto e = z.exp (); auto mask = (alpha * (e - 1 )) < 0 ; return (z > 0 ).type_as (z) + mask.type_as (z) * (alpha * e); }
前向传播 接下来比较重要的就是对应前向传播和反向传播的编写了,这里面其实依旧是将我们前面使用的Python代码来转化为C++的代码的编写,逻辑都是一样的,只不过语言是有些不同的,这里forward不需要传入ctx参数,所以一共有五个参数,实际上跟Python实现的一一对应,只是转化为C++的扩展而已。
以前向传播为例子,这里面有一些语法和用法是不一样的,比如Pytorch里面的torch.cat对应着C++里面的torch::cat,还有比较不一样的就是F.linear对应着torch.addmm,除此之外,大部分的方法我们都可以在前面加一个前缀torch::即可,这也算写C++扩展的一个规律。
torch::addmm 是 PyTorch 中的一个函数,用于执行矩阵的乘法和加法操作。具体来说,它执行以下操作:
1 result = beta * mat + alpha * (mat1 @ mat2)
其中,mat 是输出矩阵,mat1 和 mat2 是输入矩阵,alpha 和 beta 是标量系数。这个函数通常用于线性代数运算,特别是在神经网络的前向传播过程中经常会用到。
1 2 3 4 5 6 7 8 9 10 11 12 13 14 15 16 17 18 19 20 21 22 23 24 25 26 27 std::vector<at::Tensor> lltm_forward ( torch::Tensor input, torch::Tensor weights, torch::Tensor bias, torch::Tensor old_h, torch::Tensor old_cell) auto X = torch::cat ({old_h, input}, 1 ); auto gate_weights = torch::addmm (bias, X, weights.transpose (0 , 1 )); auto gates = gate_weights.chunk (3 , 1 ); auto input_gate = torch::sigmoid (gates[0 ]); auto output_gate = torch::sigmoid (gates[1 ]); auto candidate_cell = torch::elu (gates[2 ], 1.0 ); auto new_cell = old_cell + candidate_cell * input_gate; auto new_h = torch::tanh (new_cell) * output_gate; return {new_h, new_cell, input_gate, output_gate, candidate_cell, X, gate_weights}; }
反向传播 反向传播与前向传播是类似的,有一点不同的是,由于没有ctx存储信息,所以我们的传入参数还包括ctx里面的参数,都是torch::Tensor格式,根据Python编写的反向传播的代码,对应着C++实现即可,其实也是一模一样,一一对应的。
1 2 3 4 5 6 7 8 9 10 11 12 13 14 15 16 17 18 19 20 21 22 23 24 25 26 27 28 29 30 31 32 33 34 35 36 37 std::vector<torch::Tensor> lltm_backward ( torch::Tensor grad_h, torch::Tensor grad_cell, torch::Tensor new_cell, torch::Tensor input_gate, torch::Tensor output_gate, torch::Tensor candidate_cell, torch::Tensor X, torch::Tensor gate_weights, torch::Tensor weights) auto d_output_gate = torch::tanh (new_cell) * grad_h; auto d_tanh_new_cell = output_gate * grad_h; auto d_new_cell = d_tanh (new_cell) * d_tanh_new_cell + grad_cell; auto d_old_cell = d_new_cell; auto d_candidate_cell = input_gate * d_new_cell; auto d_input_gate = candidate_cell * d_new_cell; auto gates = gate_weights.chunk (3 , 1 ); d_input_gate *= d_sigmoid (gates[0 ]); d_output_gate *= d_sigmoid (gates[1 ]); d_candidate_cell *= d_elu (gates[2 ]); auto d_gates = torch::cat ({d_input_gate, d_output_gate, d_candidate_cell}, 1 ); auto d_weights = d_gates.t ().mm (X); auto d_bias = d_gates.sum (0 , true ); auto d_X = d_gates.mm (weights); const auto state_size = grad_h.size (1 ); auto d_old_h = d_X.slice (1 , 0 , state_size); auto d_input = d_X.slice (1 , state_size); return {d_old_h, d_input, d_weights, d_bias, d_old_cell}; }
完成上述代码的编写之后,我们就只需要PYBIND11_MODULE来进行绑定,再简单介绍一下他的用处,他的作用其实就是一个命名的绑定,也就是Python里面的forward为C++里面的lltm_forward,这样调用模块的时候,Python中的函数就会找到对应的C++函数来进行运行。
PYBIND11_MODULE这是 Python 调用 C++ 函数的关键部分。这个函数会在Python执行import语句时被调用,其接受两个参数,
第一个参数为模块名称,这里我们直接将lltm_cpp填入,稍候可以在Python中使用import lltm_cpp导入该模块;第二个参数m是创建Python关联代码的主接口,其类型为py::module_。module_::def()用于生成能够将lltm_cpp函数暴露给Python的代码,其第一个参数为字符串 ,将会成为Python中调用的函数名;
第二个参数是C++函数 的引用;
第三个参数是说明字符串 ,在Python中可以使用help(lltm_cpp)查看。比如下面的例子中,C++ 中的函数 lltm_forward 对应 Python 中的 forward。
1 2 3 4 PYBIND11_MODULE (TORCH_EXTENSION_NAME, m) { m.def ("forward" , &lltm_forward, "LLTM forward" ); m.def ("backward" , &lltm_backward, "LLTM backward" ); }
C++扩展调用 C++扩展一般有两种方式
通过setuptools“提前”构建
通过torch.utils.cpp_extension.load()“实时”构建
对于这两种方法,如果你的代码只运行一次,可以利用jit实时构建,这样不用去python setup.py来安装,但是如果你会多次复用这个C++扩展,那么还是需要去用第一种方法,这样后续运行的时候不需要一直构建,这样等待的时间就回比较长。
接下来先试用setuptools进行构建,编写一个 setup.py 文件,主要用于定义和说明一些重要的信息。其中关键的参数包括:
name:Python 调用的包的名称。ext_modules 的 sources:需要编译的 C++ 源文件,如果有多个 C++ 文件,需要列举所有。cmdclass:用BuildExtension执行许多必需的配置步骤和检查,并在混合C++/CUDA扩展的情况下处理混合编译。
1 2 3 4 5 6 from setuptools import setup, Extension from torch.utils import cpp_extension setup (name='lltm_cpp' , ext_modules=[cpp_extension.CppExtension('lltm_cpp' , ['lltm.cpp' ])], cmdclass={'build_ext' : cpp_extension.BuildExtension})
完成这一步后,如果使用setuptools进行构建,我们可以使用 pip 进行安装。如果在当前文件夹下,直接运行 pip install . 即可完成安装或者我们也可以使用python set.py install,安装成功后应该会显示以下结果:
1 2 3 Installed /path/python3.10/site-packages/lltm_cpp-0.0.0-py3.10-linux-x86_64.egg Processing dependencies for lltm-cpp==0.0.0 Finished processing dependencies for lltm-cpp==0.0.0
这样后续我们就可以在对应的环境来进行import lltm_cpp来使用对应C++函数了。
JIT Compiling Extensions 除了上述的setuptools的方法,接下来介绍即时编译(JIT)机制构建C++扩展。JIT编译机制通过调用PyTorch API中的一个简单函数torch.utils.cpp_extension.load(),为你提供了一种即时编译和加载扩展的方式。
1 2 3 4 5 from torch.utils.cpp_extension import loadcppcuda_tutorial = load(name="cppcuda_tutorial" , sources=['interpolation.cpp' ],)
在这里,实际提供的是域setuptools相同的信息。在后台,这将执行以下操作:
创建一个临时目录/tmp/torch_extensions/cppcuda_tutorial,
向该临时目录发出Ninja构建文件,
将你的源文件编译成一个共享库,
将这个共享库导入为Python模块。
实际上,如果将verbose=True传递给cpp_extension.load(),你将得到有关该过程的信息:
1 2 3 4 5 6 7 8 Using /path/.cache/torch_extensions/py310_cu113 as PyTorch extensions root... Creating extension directory /path/.cache/torch_extensions/py310_cu113/lltm_cpp... Emitting ninja build file /path/.cache/torch_extensions/py310_cu113/lltm_cpp/build.ninja... Building extension module lltm_cpp... Allowing ninja to set a default number of workers... (overridable by setting the environment variable MAX_JOBS=N) [1/2] c++ -MMD -MF lltm.o.d -DTORCH_EXTENSION_NAME=lltm_cpp -DTORCH_API_INCLUDE_EXTENSION_H -DPYBIND11_COMPILER_TYPE=\"_gcc\" -DPYBIND11_STDLIB=\"_libstdcpp\" -DPYBIND11_BUILD_ABI=\"_cxxabi1011\" -isystem /path//path/python3.10/site-packages/torch/include -isystem /path//path/python3.10/site-packages/torch/include/torch/csrc/api/include -isystem /path//path/python3.10/site-packages/torch/include/TH -isystem /path//path/python3.10/site-packages/torch/include/THC -isystem /path/anaconda3/envs/ernerf/include/python3.10 -D_GLIBCXX_USE_CXX11_ABI=0 -fPIC -std=c++14 -c /path/workdirs/pytorch-cppcuda-tutorial/lltm/lltm.cpp -o lltm.o [2/2] c++ lltm.o -shared -L/path//path/python3.10/site-packages/torch/lib -lc10 -ltorch_cpu -ltorch -ltorch_python -o lltm_cpp.so Loading extension module lltm_cpp...
加速前向反向传播 实现了加速的扩展之后,我们就可以改写我们对应的LLTMFuntcion利用C++扩展来进行加速,方法很简单,就是将函数传入到LLTMFuntcion传入即可
1 2 3 4 5 6 7 8 9 10 11 12 13 14 15 16 class LLTMFunction (torch.autograd.Function): @staticmethod def forward (ctx, input , weights, bias, old_h, old_cell ): outputs = lltm_cpp.forward(input , weights, bias, old_h, old_cell) new_h, new_cell = outputs[:2 ] variables = outputs[1 :] + [weights] ctx.save_for_backward(*variables) return new_h, new_cell @staticmethod def backward (ctx, grad_h, grad_cell ): outputs = lltm_cpp.backward( grad_h.contiguous(), grad_cell.contiguous(), *ctx.saved_tensors) d_old_h, d_input, d_weights, d_bias, d_old_cell = outputs return d_input, d_weights, d_bias, d_old_h, d_old_cell
时间效率比较 与Python扩展实现类似,我们进行了与C++扩展实现类似的时间效率比较,结果显示前向传播在PyTorch自动求导机制下相对较慢,与我们手动实现相比可能有四五倍的性能差距。然而,值得注意的是,尽管前向传播的速度较慢,但所获得的结果却更为优越,相较于默认机制大约提高了2倍左右。
1 2 Forward: 0.0011254544 s | Backward 0.0005326970 s Forward: 0.0002915986 s | Backward 0.0008708093 s
CUDA扩展实现 接下来就到了重头戏,也就是CUDA扩展的实现,首先我们先看看,怎么使用CUDA去进行编程,首先CUDA的代码是cu结尾的,我们通过编写CUDA来进行一个计算加速。我们还是先按之前的方法,看看如何使用CUDA进行编程先,这里面有几个注意的点:
需要编写CUDA函数
需要在头文件.h中去定义需要使用的函数,包括一些常用的测试函数。也可以写到函数中
修改CUDA的setup.py
接下来一步一步来,首先我们写对应调用CUDA的C++文件,这里面做的主要是声明和一些定义lltm_forward,lltm_backward,lltm_cuda_forward,lltm_cuda_forward函数,具体的函数操作会在CUDA里面进行实现,这样编写以后,我们的cpp的代码就可以调用CUDA对函数来进行调用,但是由于我们使用CUDA的函数,所以这里面我们还要用到CHECK_INPUT函数来判断是否在GPU上,也就是一个检测,并且内存是否连续,因为后续要进行一个并行的计算。
1 2 3 4 5 6 7 8 9 10 11 12 13 14 15 16 17 18 19 20 21 22 23 24 25 26 27 28 29 30 31 32 33 34 35 36 37 38 39 40 41 42 43 44 45 46 47 48 49 50 51 52 53 54 55 56 57 58 59 60 61 62 63 64 65 66 67 68 69 70 71 72 73 74 75 76 77 78 79 80 #include <torch/extension.h> #include <vector> #define CHECK_CUDA(x) TORCH_CHECK(x.device().is_cuda(), #x " must be a CUDA tensor" ) #define CHECK_CONTIGUOUS(x) TORCH_CHECK(x.is_contiguous(), #x " must be contiguous" ) #define CHECK_INPUT(x) CHECK_CUDA(x); CHECK_CONTIGUOUS(x) std::vector<torch::Tensor> lltm_cuda_forward ( torch::Tensor input, torch::Tensor weights, torch::Tensor bias, torch::Tensor old_h, torch::Tensor old_cell) std::vector<torch::Tensor> lltm_cuda_backward ( torch::Tensor grad_h, torch::Tensor grad_cell, torch::Tensor new_cell, torch::Tensor input_gate, torch::Tensor output_gate, torch::Tensor candidate_cell, torch::Tensor X, torch::Tensor gate_weights, torch::Tensor weights) std::vector<torch::Tensor> lltm_forward ( torch::Tensor input, torch::Tensor weights, torch::Tensor bias, torch::Tensor old_h, torch::Tensor old_cell) CHECK_INPUT (input); CHECK_INPUT (weights); CHECK_INPUT (bias); CHECK_INPUT (old_h); CHECK_INPUT (old_cell); return lltm_cuda_forward (input, weights, bias, old_h, old_cell); } std::vector<torch::Tensor> lltm_backward ( torch::Tensor grad_h, torch::Tensor grad_cell, torch::Tensor new_cell, torch::Tensor input_gate, torch::Tensor output_gate, torch::Tensor candidate_cell, torch::Tensor X, torch::Tensor gate_weights, torch::Tensor weights) CHECK_INPUT (grad_h); CHECK_INPUT (grad_cell); CHECK_INPUT (input_gate); CHECK_INPUT (output_gate); CHECK_INPUT (candidate_cell); CHECK_INPUT (X); CHECK_INPUT (gate_weights); CHECK_INPUT (weights); return lltm_cuda_backward ( grad_h, grad_cell, new_cell, input_gate, output_gate, candidate_cell, X, gate_weights, weights); } PYBIND11_MODULE (TORCH_EXTENSION_NAME, m) { m.def ("forward" , &lltm_forward, "LLTM forward (CUDA)" ); m.def ("backward" , &lltm_backward, "LLTM backward (CUDA)" ); }
基础函数 接下来就是重中之重个,也就是我们需要写一个lltm_cuda_kernel.cu函数,也就是一个LLTM对应的CUDA函数,后面我们可以用C++调用CUDA,最基础的还是对应的基础函数CUDA函数编写,和前面类似,这里面是将前面使用的C++,Python转化为CUDA编程的格式,实际上也是对应的C++代码。
对于CUDA函数来说,首先比较的不同的就是,我们都需要使用到模板参数template<typename scalar_t>,这样就代表着scalar_t能够代表任何的类型,方便后续去调用。
__device__ __forceinline__ 这两个标记告诉编译器将函数内联到调用处,以提高执行效率。__device__ 表示这个函数在设备(GPU)上执行,而 __forceinline__ 提示编译器尽可能地进行内联优化。这都是CUDA来提高效率的一些方式,实际上的计算方式就和C++的实现是一样的。
1 2 3 4 5 6 7 8 9 10 11 12 13 14 15 16 17 18 19 20 21 22 23 24 25 26 27 28 29 30 31 32 33 34 35 36 37 38 39 40 41 42 43 44 #include <torch/extension.h> #include <cuda.h> #include <cuda_runtime.h> #include <vector> template <typename scalar_t >__device__ __forceinline__ scalar_t sigmoid (scalar_t z) { return 1.0 / (1.0 + exp (-z)); } template <typename scalar_t >__device__ __forceinline__ scalar_t d_sigmoid (scalar_t z) { const auto s = sigmoid (z); return (1.0 - s) * s; } template <typename scalar_t >__device__ __forceinline__ scalar_t d_tanh (scalar_t z) { const auto t = tanh (z); return 1 - (t * t); } template <typename scalar_t >__device__ __forceinline__ scalar_t elu ( scalar_t z, scalar_t alpha = 1.0 ) return fmax (0.0 , z) + fmin (0.0 , alpha * (exp (z) - 1.0 )); } template <typename scalar_t >__device__ __forceinline__ scalar_t d_elu ( scalar_t z, scalar_t alpha = 1.0 ) const auto e = exp (z); const auto d_relu = z < 0.0 ? 0.0 : 1.0 ; return d_relu + (((alpha * (e - 1.0 )) < 0.0 ) ? (alpha * e) : 0.0 ); }
CUDA加速原理 首先介绍一个CUDA程序实现的流程
把数据从CPU内存拷贝到GPU内存
调用核函数对存储在GPU内存中的数据进行操作
将数据从GPU内存传送回CPU内存
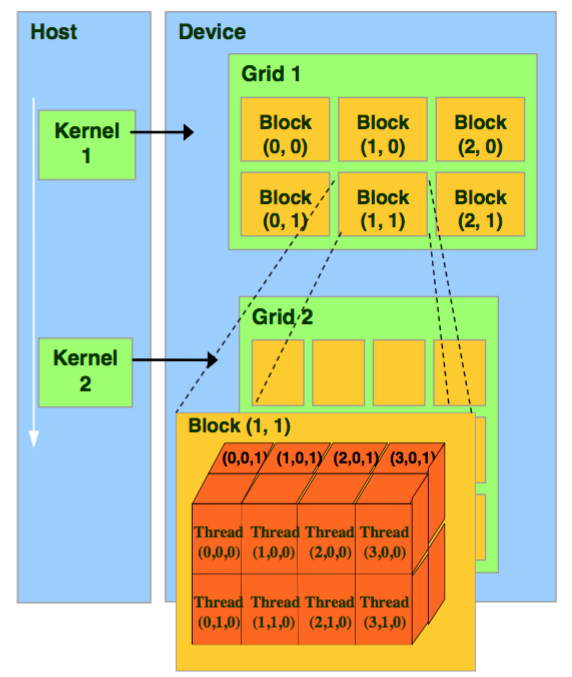
如下图所示,在利用CUDA加速的时候,图的左边是CPU,右边是GPU,我们需要把数据从CPU传到GPU中。在GPU中,就会生成对应的Grid来进行计算,每个Grid里面又有很多的block,从block中看又有很多的线程thread进行运算。我们也可以想象一下,如果计算一个矩阵的加法,我们可以让每个thread做对应的元素的相加,这样就可以大大加快计算速度,达到并行的效果。所以这之中内核(kernel)是CUDA编程中一个重要的部分,其代码在GPU上运行,比如矩阵乘法,我们就可以写一个加法的核函数,然后串行执行核函数,这样我们就快速能完成CUDA代码的编写,而不用在创建和管理大量的GPU线程时拘泥于细节。
所以我们可以发现,实际上CUDA的计算是Grid——》Block——》Thread,然后用多个Thread进行计算,这里面可能会疑惑,为什么不是直接Grid——》Thread,实际上是因为硬件的限制是Block上限是$(2^{31}-1)2^{16} 2^{16}$,Thread的上限是1024,所以这样的组合设计能够利用好更多的Thread,这也是为什么GPU速度那么快的原因。
前向传播核函数 对于CUDA编程来说,往往首先我们需要编写一个kernel模板函数,这个模板函数实际上就是说明,在一个核中的对应的计算方式和流程。这样GPU实现的就是在多个thread做这样的事情,这样就实现了并行运算,极大的提高了效率,这也是是为什么CUDA加速比较快的原因。
接下里分析函数的主体部分,主要做两件事情:
为每个threads进行编号
去除不必要的threads
在使用threads计算的时候,实际上每一个threads都有一个对应的编号,计算方式如第12,13行所示,实际上就是block的x*block的个数+block的y就能得到最后的结果,后续就是对应着每一个threads的计算,对应threads的编号index。
1 2 3 4 5 6 7 8 9 10 11 12 13 14 15 16 17 18 19 20 21 22 23 24 25 26 template <typename scalar_t >__global__ void lltm_cuda_forward_kernel ( const scalar_t *__restrict__ gates, const scalar_t *__restrict__ old_cell, scalar_t *__restrict__ new_h, scalar_t *__restrict__ new_cell, scalar_t *__restrict__ input_gate, scalar_t *__restrict__ output_gate, scalar_t *__restrict__ candidate_cell, size_t state_size ) const int column = blockIdx.x * blockDim.x + threadIdx.x; const int index = blockIdx.y * state_size + column; const int gates_row = blockIdx.y * (state_size * 3 ); if (column < state_size) { input_gate[index] = sigmoid (gates[gates_row + column]); output_gate[index] = sigmoid (gates[gates_row + state_size + column]); candidate_cell[index] = elu (gates[gates_row + 2 * state_size + column]); new_cell[index] = old_cell[index] + candidate_cell[index] * input_gate[index]; new_h[index] = tanh (new_cell[index]) * output_gate[index]; } }
前向传播 接下来我们就使用实现的lltm_cuda_forward_kernel来实现lltm_cuda_forward,前面和C++扩展的方式是一样的,以及初始化空的变量以便后续进行前向传播,对于const int threads = 256; const dim3 blocks((state_size + threads - 1) / threads, batch_size);这两行,实际上就是在定义上述提过的threads和blocks了,dim3是NVIDIA的CUDA编程中一种自定义的整型向量类型,基于用于指定维度的uint3,dim3类型最终设置的是一个三维向量,三维参数分别为x,y,z。在并行中,通常只支持三个并行,比如这里的N和F刚刚好就是两个并行,这里设置为16x16的线程,一般可以是128,256,512,不一定使用越多越好,这里面只是给了一个例子。
const dim3 blocks((state_size + threads - 1) / threads, batch_size);部分还定义了blocks的个数计算,也就是使用多大的blocks去覆盖我们计算矩阵,这里面的state_size是每一个计算的状态大小,batch_size是每次的数目,这样我们就可以计算出对应的blocks大小来进行计算。(详细解读可以看看上一篇我的博客,里面可以画图帮助理解)CUDA编程学习:自定义Pytorch+cpp/cuda extension
最后还有一个就是AT_DISPATCH_FLOATING_TYPES,这里面就是一个启动核函数的部分,这里也可以认为是一个框架函数,AT_DISPATCH_FLOATING_TYPES 是处理核函数的启动(使用 <<<...>>> 表示),它一般有三个参数
一个类型gates.type()
一个名称 "lltm_forward_cuda",用于错误消息
一个 lambda 函数,是一个模版函数template,类型别名为 scalar_t,这里面就是核函数
1 2 3 4 5 6 7 8 9 10 11 12 13 14 15 16 17 18 19 20 21 22 23 24 25 26 27 28 29 30 31 32 33 34 35 36 37 38 39 40 41 42 43 44 45 std::vector<torch::Tensor> lltm_cuda_forward ( torch::Tensor input, torch::Tensor weights, torch::Tensor bias, torch::Tensor old_h, torch::Tensor old_cell ) auto X = torch::cat ({old_h, input}, 1 ); auto gate_weights = torch::addmm (bias, X, weights.transpose (0 , 1 )); const auto batch_size = old_cell.size (0 ); const auto state_size = old_cell.size (1 ); auto gates = gate_weights.reshape ({batch_size, 3 , state_size}); auto new_h = torch::zeros_like (old_cell); auto new_cell = torch::zeros_like (old_cell); auto input_gate = torch::zeros_like (old_cell); auto output_gate = torch::zeros_like (old_cell); auto candidate_cell = torch::zeros_like (old_cell); const int threads = 256 ; const dim3 blocks ((state_size + threads - 1 ) / threads, batch_size) AT_DISPATCH_FLOATING_TYPES (gates.type (), "lltm_forward_cuda" , ([&] { lltm_cuda_forward_kernel<scalar_t ><<<blocks, threads>>>( gates.data <scalar_t >(), old_cell.data <scalar_t >(), new_h.data <scalar_t >(), new_cell.data <scalar_t >(), input_gate.data <scalar_t >(), output_gate.data <scalar_t >(), candidate_cell.data <scalar_t >(), state_size); })); return {new_h, new_cell, input_gate, output_gate, candidate_cell, X, gates}; }
反向传播 与前向传播类似,反向传播也是类似的方法进行了实现,这里具体就不讲述,几乎和前向传播的步骤是一样的。
1 2 3 4 5 6 7 8 9 10 11 12 13 14 15 16 17 18 19 20 21 22 23 24 25 26 27 28 29 30 31 32 33 34 35 36 37 38 39 40 41 42 43 44 45 46 47 48 49 50 51 52 53 54 55 56 57 58 59 60 61 62 63 64 65 66 67 68 69 70 71 72 73 74 75 76 77 78 79 80 81 82 83 84 85 86 87 88 89 90 91 92 93 94 95 96 template <typename scalar_t >__global__ void lltm_cuda_backward_kernel ( scalar_t *d_old_cell, scalar_t *d_gates, const scalar_t *grad_h, const scalar_t *grad_cell, const scalar_t *new_cell, const scalar_t *input_gate, const scalar_t *output_gate, const scalar_t *candidate_cell, const scalar_t *gate_weights, int state_size ) const int column = blockIdx.x * blockDim.x + threadIdx.x; const int index = blockIdx.y * state_size + column; const int gates_row = blockIdx.y * (state_size * 3 ); if (column < state_size) { const auto d_output_gate = tanh (new_cell[index]) * grad_h[index]; const auto d_tanh_new_cell = output_gate[index] * grad_h[index]; const auto d_new_cell = d_tanh (new_cell[index]) * d_tanh_new_cell + grad_cell[index]; d_old_cell[index] = d_new_cell; const auto d_candidate_cell = input_gate[index] * d_new_cell; const auto d_input_gate = candidate_cell[index] * d_new_cell; d_gates[gates_row + column] = d_input_gate * d_sigmoid (gate_weights[gates_row + column]); d_gates[gates_row + state_size + column] = d_output_gate * d_sigmoid (gate_weights[gates_row + state_size + column]); d_gates[gates_row + 2 * state_size + column] = d_candidate_cell * d_elu (gate_weights[gates_row + 2 * state_size + column]); } } std::vector<torch::Tensor> lltm_cuda_backward ( torch::Tensor grad_h, torch::Tensor grad_cell, torch::Tensor new_cell, torch::Tensor input_gate, torch::Tensor output_gate, torch::Tensor candidate_cell, torch::Tensor X, torch::Tensor gates, torch::Tensor weights ) auto d_old_cell = torch::zeros_like (new_cell); auto d_gates = torch::zeros_like (gates); const auto batch_size = new_cell.size (0 ); const auto state_size = new_cell.size (1 ); const int threads = 256 ; const dim3 blocks ((state_size + threads - 1 ) / threads, batch_size) AT_DISPATCH_FLOATING_TYPES (X.type (), "lltm_backward_cuda" , ([&] { lltm_cuda_backward_kernel<scalar_t ><<<blocks, threads>>>( d_old_cell.data <scalar_t >(), d_gates.data <scalar_t >(), grad_h.data <scalar_t >(), grad_cell.data <scalar_t >(), new_cell.data <scalar_t >(), input_gate.data <scalar_t >(), output_gate.data <scalar_t >(), candidate_cell.data <scalar_t >(), gates.data <scalar_t >(), state_size ); })); auto d_gate_weights = d_gates.reshape ({batch_size, 3 * state_size}); auto d_weights = d_gate_weights.t ().mm (X); auto d_bias = d_gate_weights.sum (0 , true ); auto d_X = d_gate_weights.mm (weights); auto d_old_h = d_X.slice (1 , 0 , state_size); auto d_input = d_X.slice (1 , state_size); return {d_old_h, d_input, d_weights, d_bias, d_old_cell}; }
时间效率对比 接下来,我们就可以调用扩展,方法是一样的,所以这里不多说,我使用的Jit的方式进行实时构建
1 2 3 4 from torch.utils.cpp_extension import loadlltm_cuda = load(name='lltm_cuda' , sources=['lltm/lltm_cuda.cpp' , 'lltm/lltm_cuda_kernel.cu' ], verbose=True )
同样也是加速对应的LLTMFunction,调用对应CUDA写的forward和backward即可。
1 2 3 4 5 6 7 8 9 10 11 12 13 14 15 16 17 class LLTMFunction (torch.autograd.Function): @staticmethod def forward (ctx, input , weights, bias, old_h, old_cell ): outputs = lltm_cuda.forward(input , weights, bias, old_h, old_cell) new_h, new_cell = outputs[:2 ] variables = outputs[1 :] + [weights] ctx.save_for_backward(*variables) return new_h, new_cell @staticmethod def backward (ctx, grad_h, grad_cell ): outputs = lltm_cuda.backward( grad_h.contiguous(), grad_cell.contiguous(), *ctx.saved_tensors) d_old_h, d_input, d_weights, d_bias, d_old_cell = outputs return d_input, d_weights, d_bias, d_old_h, d_old_cell
参考 https://github.com/pytorch/extension-cpp
https://pytorch.org/tutorials/advanced/cpp_extension.html#
https://github.com/kevinghst/lltm_experiment

 wechat