2023.12 更新 📆
用户可以上传任意图片进行对话
2024.01 更新 📆
令人兴奋的消息!我现在已经将强大的GeminiPro和Qwen大模型融入到我们的对话场景中。用户现在可以在对话中上传任何图片,为我们的互动增添了全新的层面。 更新了FastAPI的部署调用方法。 更新了微软TTS的高级设置选项,增加声音种类的多样性,以及加入视频字幕加强可视化。 更新了GPT多轮对话系统,使得对话有上下文联系,提高数字人的交互性和真实感
2024.02 更新 📆
更新了Gradio的版本为最新版本4.16.0,使得界面拥有更多的功能,比如可以摄像头拍摄图片构建数字人等 更新了ASR和THG,其中ASR加入了阿里的FunASR,具体更快的速度;THG部分加入了Wav2Lip模型,ER-NeRF在准备中(Comming Soon)
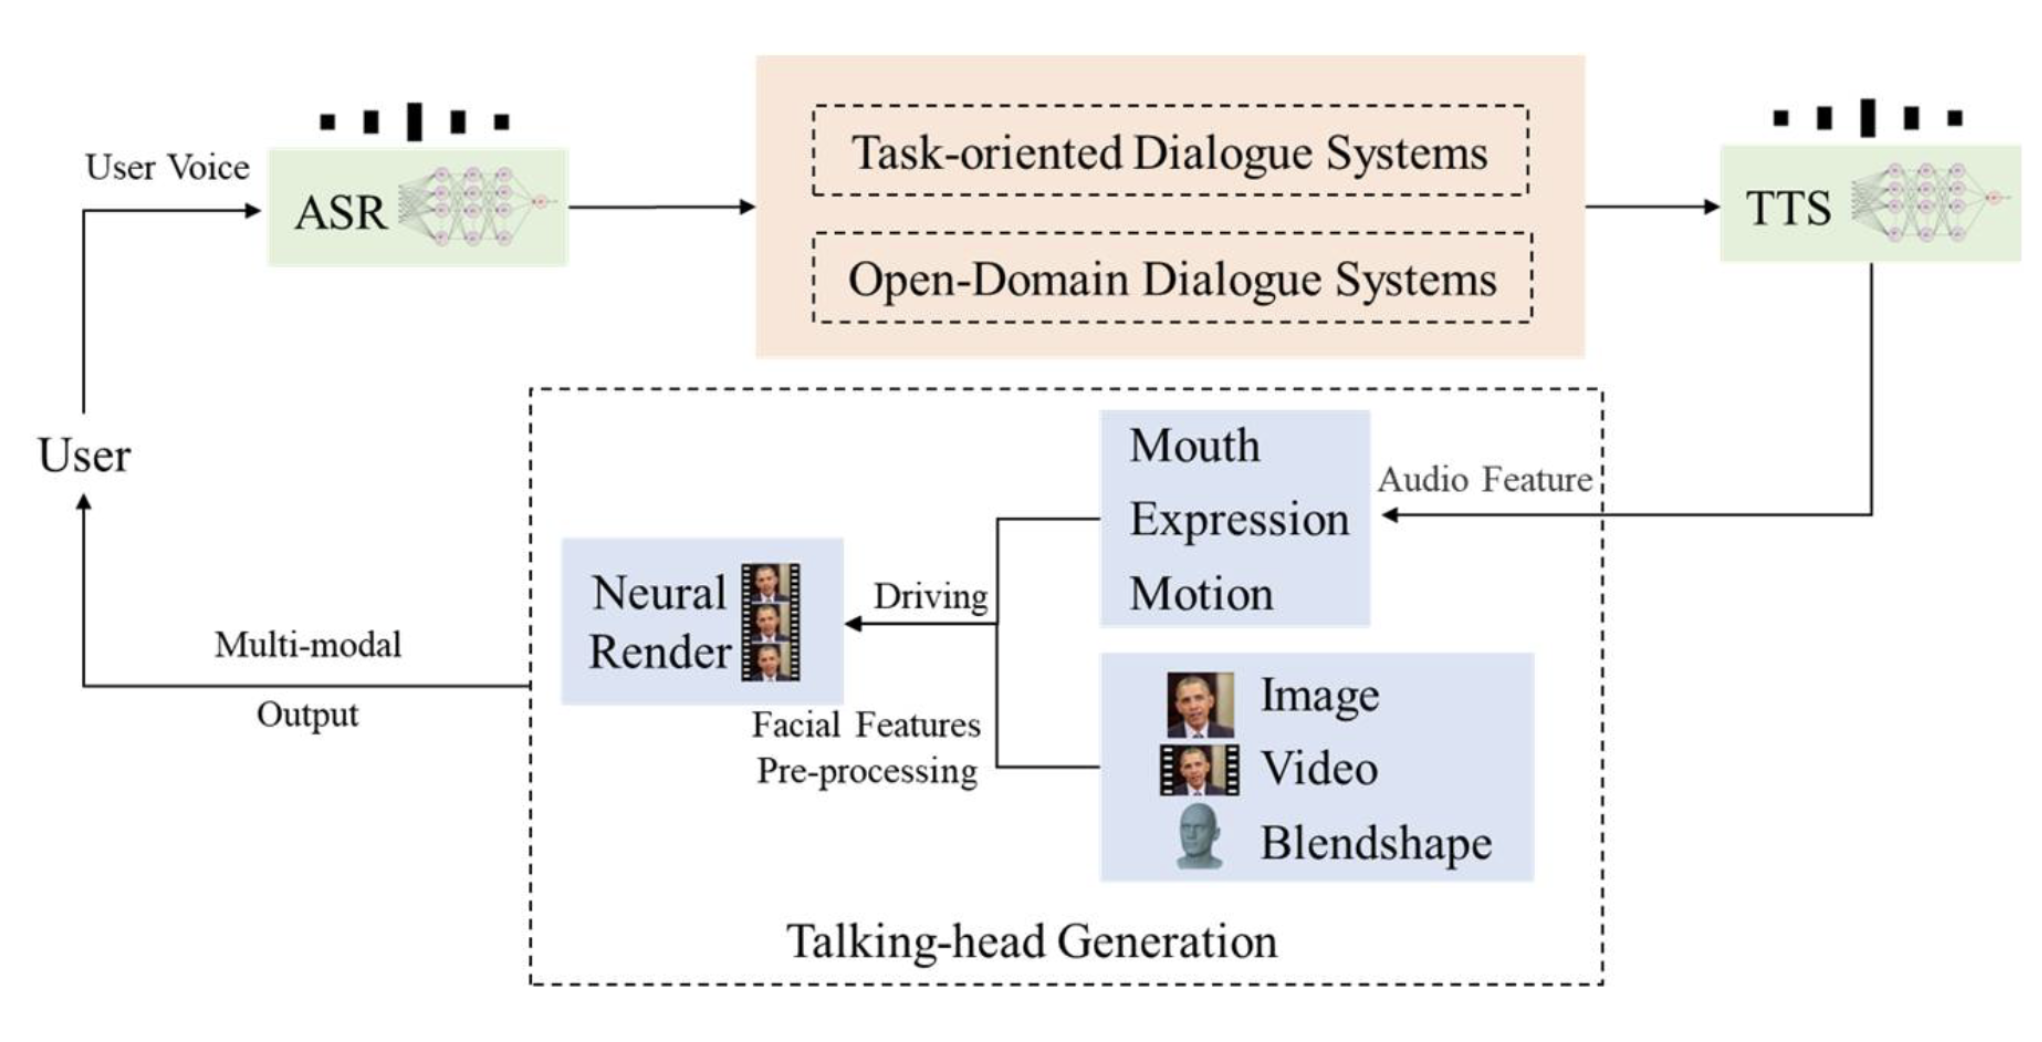
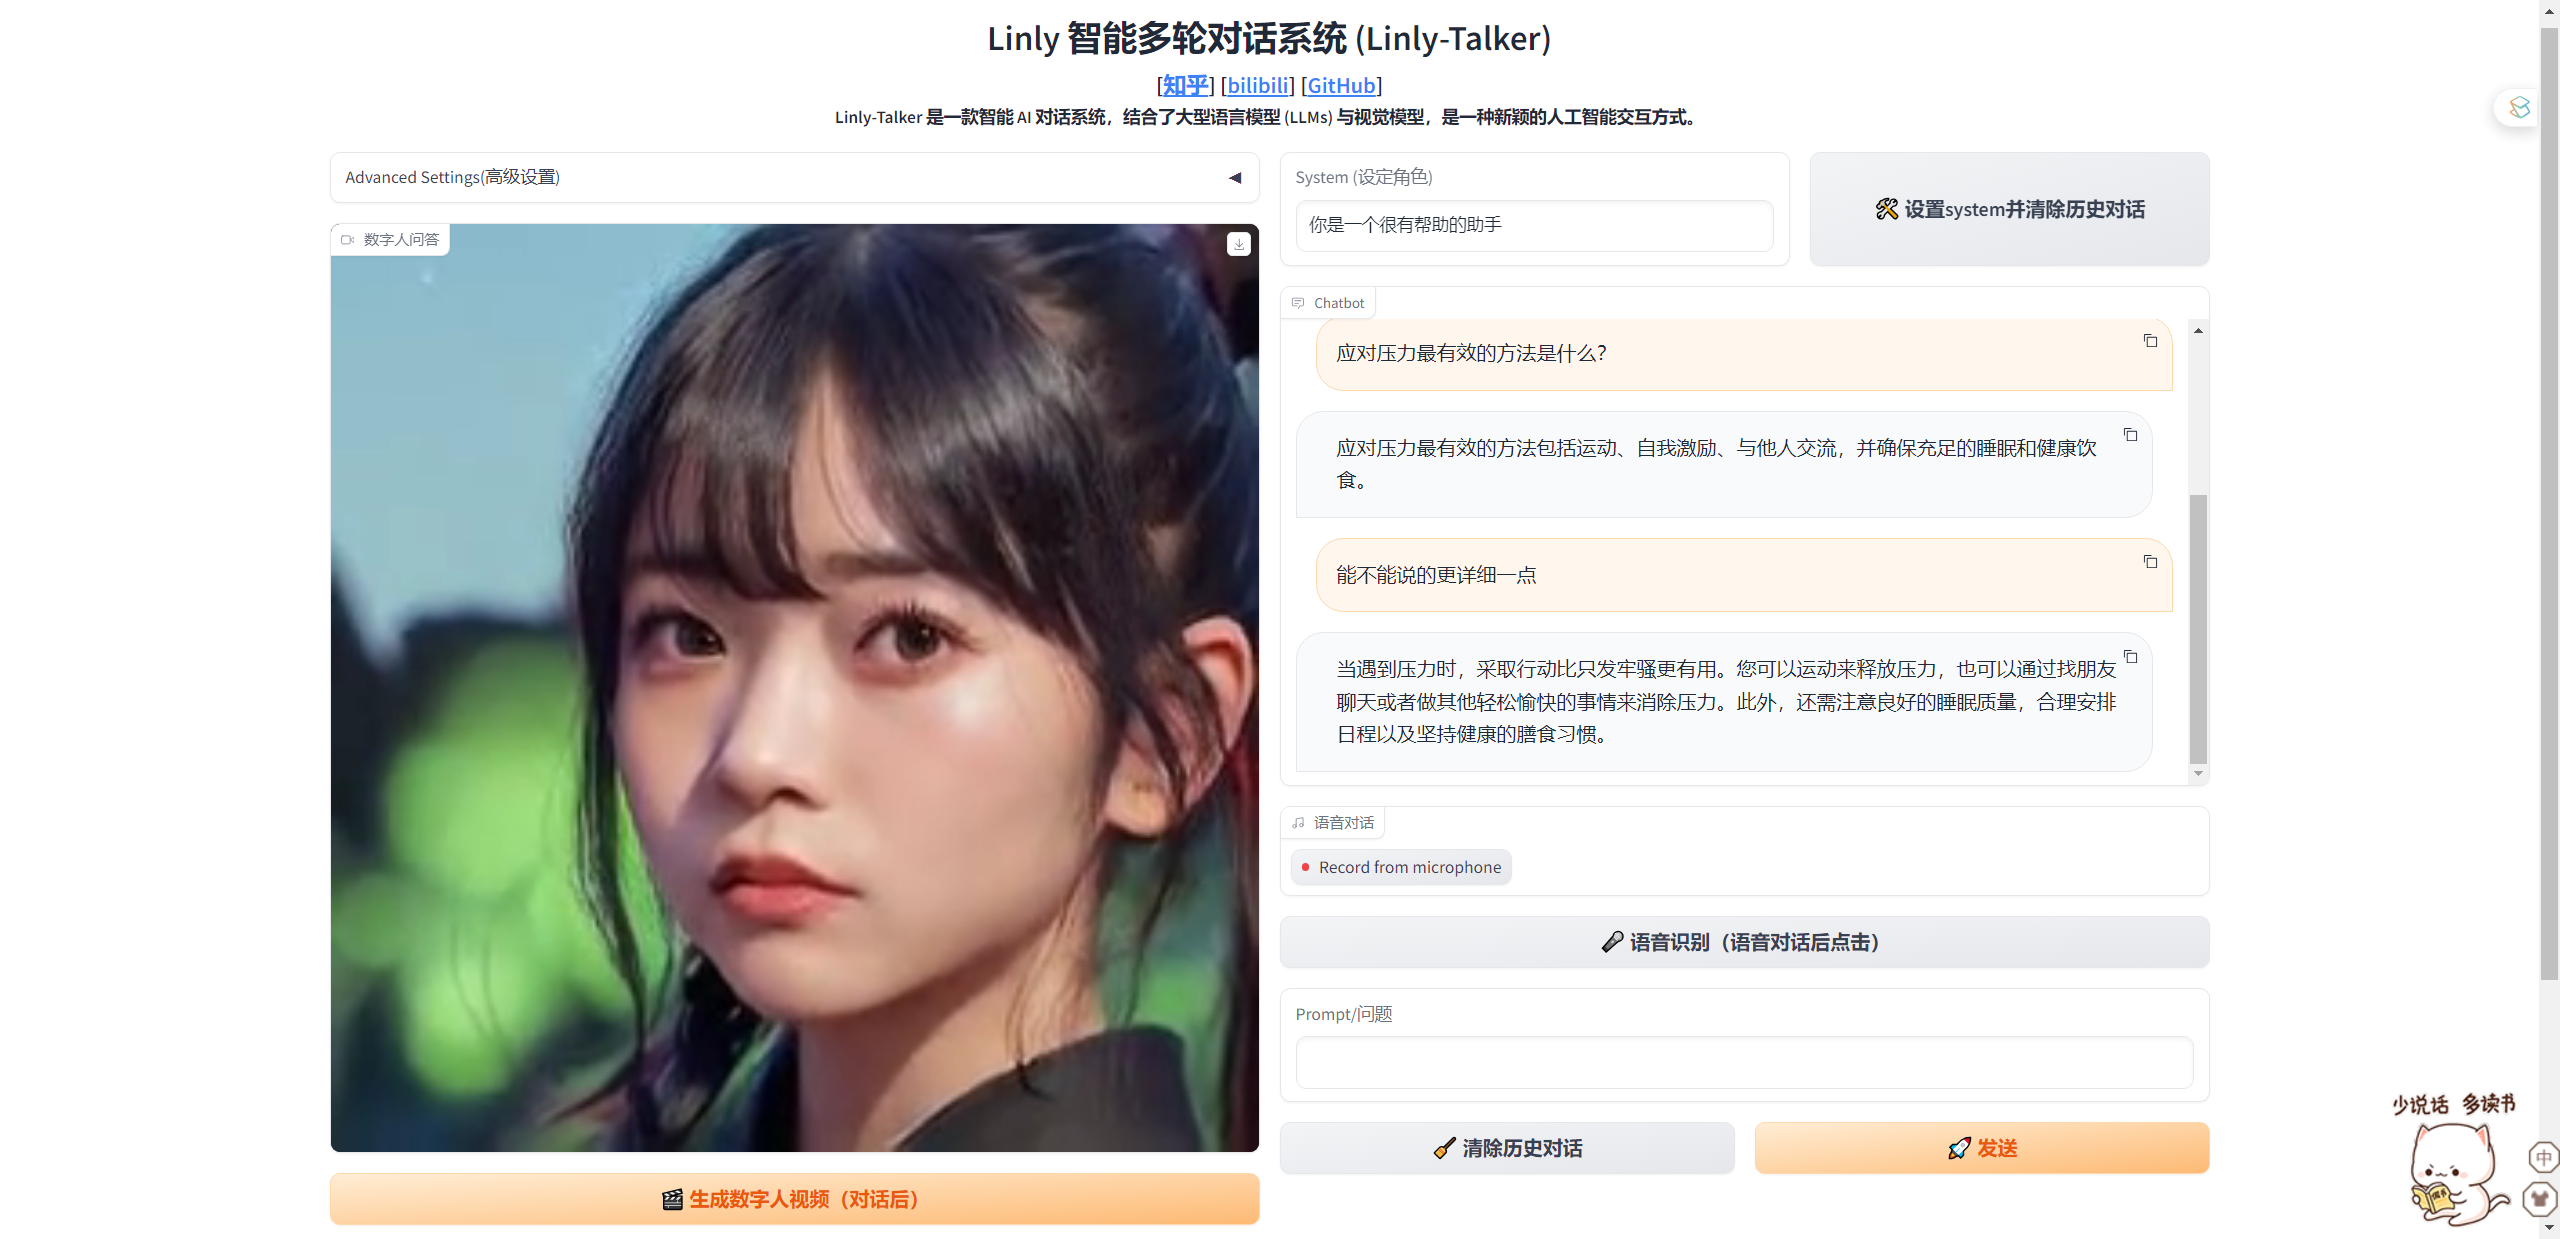
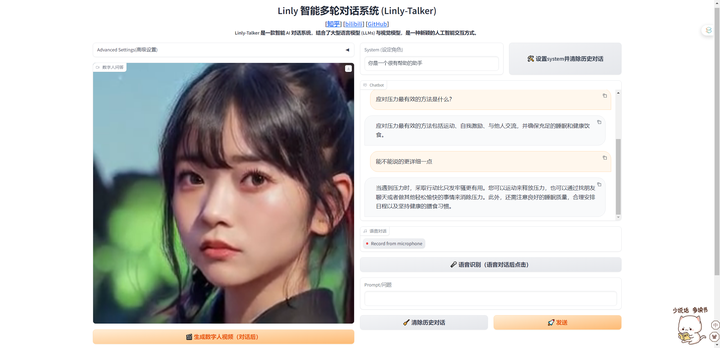
介绍 Linly-Talker是一个将大型语言模型与视觉模型相结合的智能AI系统,创建了一种全新的人机交互方式。它集成了各种技术,例如Whisper、Linly、微软语音服务和SadTalker会说话的生成系统。该系统部署在Gradio上,允许用户通过提供图像与AI助手进行交谈。用户可以根据自己的喜好进行自由的对话或内容生成。
TO## TO DO LIST
[x] 基本完成对话系统流程,能够语音对话
[x] 加入了LLM大模型,包括Linly,Qwen和GeminiPro的使用
[x] 可上传任意数字人照片进行对话
[x] Linly加入FastAPI调用方式
[x] 利用微软TTS加入高级选项,可设置对应人声以及音调等参数,增加声音的多样性
[x] 视频生成加入字幕,能够更好的进行可视化
[x] GPT多轮对话系统(提高数字人的交互性和真实感,增强数字人的智能)
[x] 优化Gradio界面,加入更多模型,如Wav2Lip,FunASR等
[ ] 语音克隆技术(语音克隆合成自己声音,提高数字人分身的真实感和互动体验)
[ ] 加入Langchain的框架,建立本地知识库
[ ] 实时语音识别(人与数字人之间就可以通过语音进行对话交流)
🔆 该项目 Linly-Talker 正在进行中 - 欢迎提出PR请求!如果您有任何关于新的模型方法、研究、技术或发现运行错误的建议,请随时编辑并提交 PR。您也可以打开一个问题或通过电子邮件直接联系我。📩⭐ 如果您发现这个Github Project有用,请给它点个星!🤩
示例
文字/语音对话
数字人回答
应对压力最有效的方法是什么?
如何进行时间管理?
撰写一篇交响乐音乐会评论,讨论乐团的表演和观众的整体体验。
翻译成中文:Luck is a dividend of sweat. The more you sweat, the luckier you get.
创建环境 1 2 3 4 5 6 7 8 9 10 11 12 conda create -n linly python=3.9 conda activate linly conda install pytorch==1.12.1 torchvision==0.13.1 torchaudio==0.12.1 cudatoolkit=11.3 -c pytorch pip install torch==1.12.1+cu113 torchvision==0.13.1+cu113 torchaudio==0.12.1 --extra-index-url https://download.pytorch.org/whl/cu113 conda install -q ffmpeg pip install -r requirements_app.txt
为了大家的部署使用方便,更新了一个configs.py文件,可以对其进行一些超参数修改即可
1 2 3 4 5 6 7 8 9 10 11 12 port = 7870 ip = '127.0.0.1' api_port = 7871 mode = 'api' mode = 'offline' model_path = 'Linly-AI/Chinese-LLaMA-2-7B-hf' ssl_certfile = "/path/to/Linly-Talker/https_cert/cert.pem" ssl_keyfile = "/path/to/Linly-Talker/https_cert/key.pem"
ASR - Speech Recognition Whisper 借鉴OpenAI的Whisper实现了ASR的语音识别,具体使用方法参考 https://github.com/openai/whisper
1 2 3 4 5 6 7 8 9 10 11 12 13 14 15 16 17 ''' https://github.com/openai/whisper pip install -U openai-whisper ''' import whisperclass WhisperASR : def __init__ (self, model_path ): self.LANGUAGES = { "en" : "english" , "zh" : "chinese" , } self.model = whisper.load_model(model_path) def transcribe (self, audio_file ): result = self.model.transcribe(audio_file) return result["text" ]
FunASR 阿里的FunASR的语音识别效果也是相当不错,而且时间也是比whisper更快的,更能达到实时的效果,所以也将FunASR添加进去了,在ASR文件夹下的FunASR文件里可以进行体验,需要注意的是,在第一次运行的时候,需要安装以下库,参考 https://github.com/alibaba-damo-academy/FunASR
1 2 3 pip install funasr pip install modelscope pip install -U rotary_embedding_torch
1 2 3 4 5 6 7 8 9 10 11 12 13 14 15 16 17 18 19 20 21 22 23 24 ''' Reference: https://github.com/alibaba-damo-academy/FunASR pip install funasr pip install modelscope pip install -U rotary_embedding_torch ''' try : from funasr import AutoModel except : print ("如果想使用FunASR,请先安装funasr,若使用Whisper,请忽略此条信息" ) class FunASR : def __init__ (self ) -> None : self.model = AutoModel(model="paraformer-zh" , model_revision="v2.0.4" , vad_model="fsmn-vad" , vad_model_revision="v2.0.4" , punc_model="ct-punc-c" , punc_model_revision="v2.0.4" , ) def transcribe (self, audio_file ): res = self.model.generate(input =audio_file, batch_size_s=300 ) print (res) return res[0 ]['text' ]
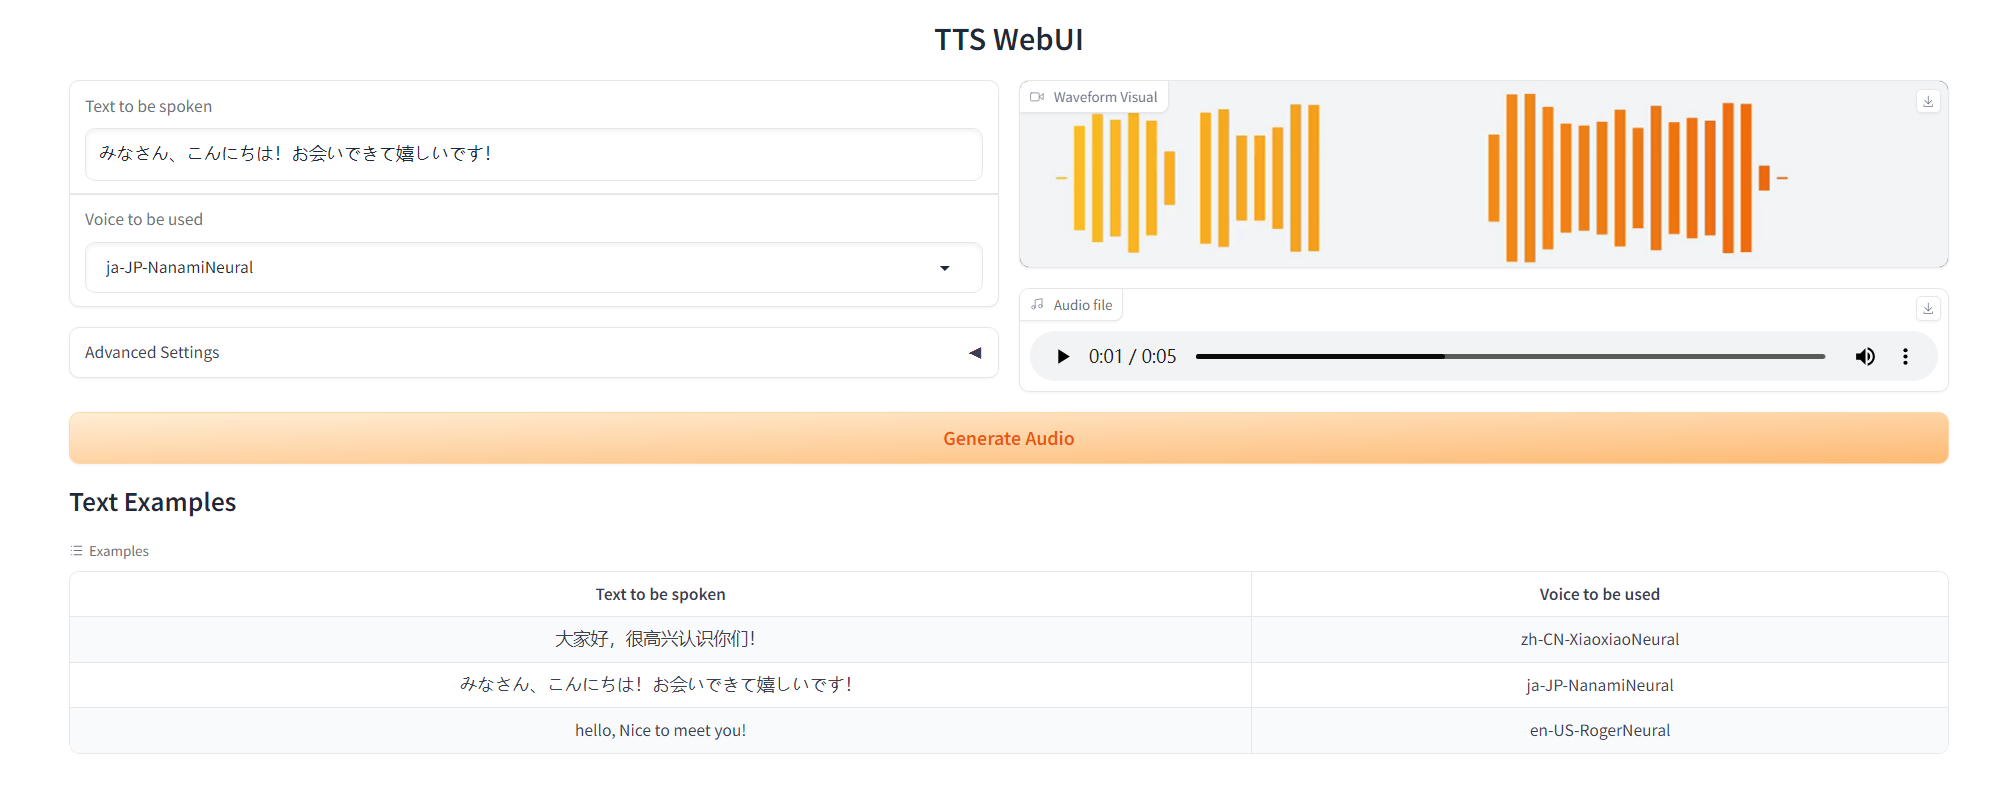
TTS - Edge TTS 使用微软语音服务,具体使用方法参考https://github.com/rany2/edge-tts
我编写了一个 EdgeTTS 的类,能够更好的使用,并且增加了保存字幕文件的功能
1 2 3 4 5 6 7 8 9 10 11 12 13 14 15 16 17 18 19 20 21 22 23 24 25 26 27 28 29 30 31 32 33 34 35 36 37 38 39 40 41 42 43 44 45 46 47 48 49 50 51 52 53 54 55 56 class EdgeTTS : def __init__ (self, list_voices = False , proxy = None ) -> None : voices = list_voices_fn(proxy=proxy) self.SUPPORTED_VOICE = [item['ShortName' ] for item in voices] self.SUPPORTED_VOICE.sort(reverse=True ) if list_voices: print (", " .join(self.SUPPORTED_VOICE)) def preprocess (self, rate, volume, pitch ): if rate >= 0 : rate = f'+{rate} %' else : rate = f'{rate} %' if pitch >= 0 : pitch = f'+{pitch} Hz' else : pitch = f'{pitch} Hz' volume = 100 - volume volume = f'-{volume} %' return rate, volume, pitch def predict (self,TEXT, VOICE, RATE, VOLUME, PITCH, OUTPUT_FILE='result.wav' , OUTPUT_SUBS='result.vtt' , words_in_cue = 8 ): async def amain () -> None : """Main function""" rate, volume, pitch = self.preprocess(rate = RATE, volume = VOLUME, pitch = PITCH) communicate = Communicate(TEXT, VOICE, rate = rate, volume = volume, pitch = pitch) subs: SubMaker = SubMaker() sub_file: Union [TextIOWrapper, TextIO] = ( open (OUTPUT_SUBS, "w" , encoding="utf-8" ) ) async for chunk in communicate.stream(): if chunk["type" ] == "audio" : pass elif chunk["type" ] == "WordBoundary" : subs.create_sub((chunk["offset" ], chunk["duration" ]), chunk["text" ]) sub_file.write(subs.generate_subs(words_in_cue)) await communicate.save(OUTPUT_FILE) asyncio.run(amain()) with open (OUTPUT_SUBS, 'r' , encoding='utf-8' ) as file: vtt_lines = file.readlines() vtt_lines_without_spaces = [line.replace(" " , "" ) if "-->" not in line else line for line in vtt_lines] with open (OUTPUT_SUBS, 'w' , encoding='utf-8' ) as output_file: output_file.writelines(vtt_lines_without_spaces) return OUTPUT_FILE, OUTPUT_SUBS
同时在src文件夹下,写了一个简易的WebUI
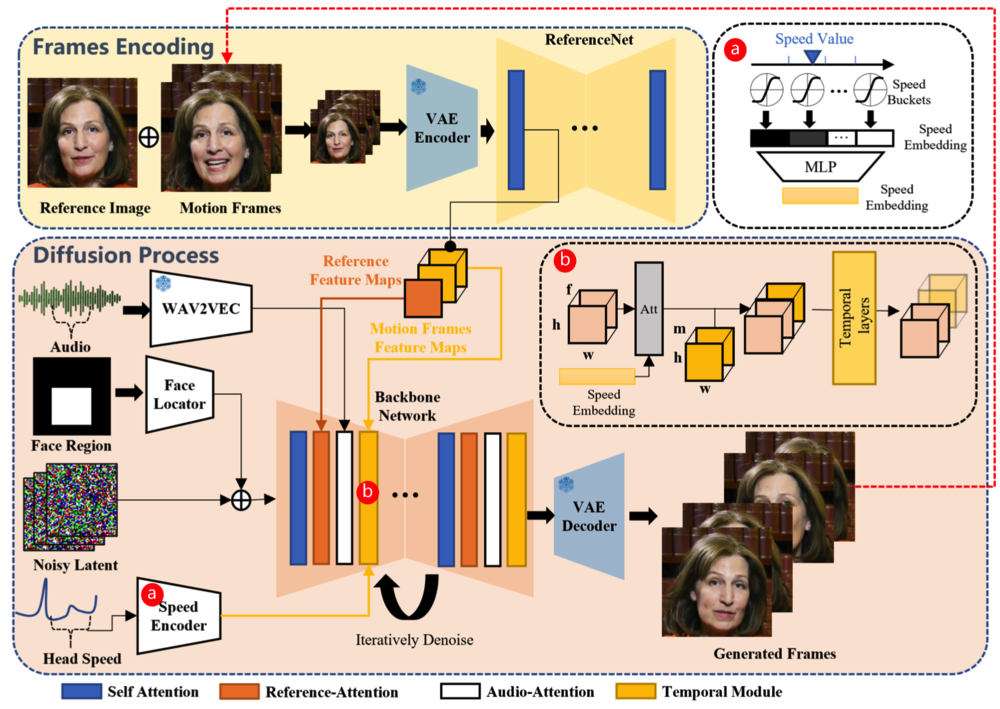
THG - Avatar SadTalker 数字人生成可使用SadTalker(CVPR 2023),详情介绍见 https://sadtalker.github.io
在使用前先下载SadTalker模型:
1 bash scripts/sadtalker_download_models.sh
Baidu (百度云盘) (Password: linl)
如果百度网盘下载,记住是放在checkpoints文件夹下,百度网盘下载的默认命名为sadtalker,实际应该重命名为checkpoints
Wav2Lip 数字人生成还可使用Wav2Lip(ACM 2020),详情介绍见 https://github.com/Rudrabha/Wav2Lip
在使用前先下载Wav2Lip模型:
Model
Description
Link to the model
Wav2Lip
Highly accurate lip-sync
Link
Wav2Lip + GAN
Slightly inferior lip-sync, but better visual quality
Link
Expert Discriminator
Weights of the expert discriminator
Link
Visual Quality Discriminator
Weights of the visual disc trained in a GAN setup
Link
1 2 3 4 5 6 7 8 9 10 11 12 13 14 15 16 17 18 19 20 21 22 23 24 25 26 27 28 29 30 class Wav2Lip : def __init__ (self, path = 'checkpoints/wav2lip.pth' ): self.fps = 25 self.resize_factor = 1 self.mel_step_size = 16 self.static = False self.img_size = 96 self.face_det_batch_size = 2 self.box = [-1 , -1 , -1 , -1 ] self.pads = [0 , 10 , 0 , 0 ] self.nosmooth = False self.device = 'cuda' if torch.cuda.is_available() else 'cpu' self.model = self.load_model(path) def load_model (self, checkpoint_path ): model = wav2lip_mdoel() print ("Load checkpoint from: {}" .format (checkpoint_path)) if self.device == 'cuda' : checkpoint = torch.load(checkpoint_path) else : checkpoint = torch.load(checkpoint_path, map_location=lambda storage, loc: storage) s = checkpoint["state_dict" ] new_s = {} for k, v in s.items(): new_s[k.replace('module.' , '' )] = v model.load_state_dict(new_s) model = model.to(self.device) return model.eval ()
ER-NeRF(Comming Soon) ER-NeRF(ICCV2023)是使用最新的NeRF技术构建的数字人,拥有定制数字人的特性,只需要一个人的五分钟左右到视频即可重建出来,具体可参考 https://github.com/Fictionarry/ER-NeRF
后续会针对此更新
LLM - Conversation Linly-AI Linly来自深圳大学数据工程国家重点实验室,参考https://github.com/CVI-SZU/Linly
下载Linly模型:https://huggingface.co/Linly-AI/Chinese-LLaMA-2-7B-hf
可以使用git下载
1 2 git lfs install git clone https://huggingface.co/Linly-AI/Chinese-LLaMA-2-7B-hf
或者使用huggingface的下载工具huggingface-cli
1 2 3 4 5 6 7 8 9 pip install -U huggingface_hub export HF_ENDPOINT="https://hf-mirror.com" $env :HF_ENDPOINT="https://hf-mirror.com" huggingface-cli download --resume-download Linly-AI/Chinese-LLaMA-2-7B-hf --local-dir Linly-AI/Chinese-LLaMA-2-7B-hf
或使用API:
1 2 3 4 5 6 7 8 9 10 11 12 13 14 15 16 17 18 19 20 21 22 23 24 curl -X POST -H "Content-Type: application/json" -d '{"question": "北京有什么好玩的地方?"}' http://url:port import requests url = "http://url:port" headers = { "Content-Type" : "application/json" } data = { "question" : "北京有什么好玩的地方?" } response = requests.post(url, headers=headers, json=data) answer, tag = response.json() if tag == 'success' : response_text = answer[0] else : print ("fail" ) print (response_text)
API部署推荐FastAPI ,现在更新了 FastAPI 的API使用版本,FastAPI 是一个高性能、易用且现代的Python Web 框架,它通过使用最新的Python 特性和异步编程,提供了快速开发Web API 的能力。 该框架不仅易于学习和使用,还具有自动生成文档、数据验证等强大功能。 无论是构建小型项目还是大型应用程序,FastAPI 都是一个强大而有效的工具。
首先安装部署API所使用的库
1 2 pip install fastapi==0.104.1 pip install uvicorn==0.24.0.post1
其他使用方法大致相同,主要是不同代码实现方式,会更加简单边界,并且处理并发也会更好
1 2 3 4 5 6 7 8 9 10 11 12 13 14 15 16 17 18 19 20 21 22 23 24 25 26 27 28 29 30 31 32 33 34 35 36 37 38 39 40 41 42 43 44 45 46 47 48 49 50 51 52 53 54 55 56 57 58 59 60 61 62 63 64 65 66 67 68 69 70 71 from fastapi import FastAPI, Requestfrom transformers import AutoTokenizer, AutoModelForCausalLM, GenerationConfigimport uvicornimport jsonimport datetimeimport torchfrom configs import model_path, api_portDEVICE = "cuda" DEVICE_ID = "0" CUDA_DEVICE = f"{DEVICE} :{DEVICE_ID} " if DEVICE_ID else DEVICE def torch_gc (): if torch.cuda.is_available(): with torch.cuda.device(CUDA_DEVICE): torch.cuda.empty_cache() torch.cuda.ipc_collect() app = FastAPI() @app.post("/" async def create_item (request: Request ): global model, tokenizer json_post_raw = await request.json() json_post = json.dumps(json_post_raw) json_post_list = json.loads(json_post) prompt = json_post_list.get('prompt' ) history = json_post_list.get('history' ) max_length = json_post_list.get('max_length' ) top_p = json_post_list.get('top_p' ) temperature = json_post_list.get('temperature' ) prompt = f"请用少于25个字回答以下问题 ### Instruction:{prompt} ### Response:" inputs = tokenizer(prompt, return_tensors="pt" ).to("cuda:0" ) generate_ids = model.generate(inputs.input_ids, max_new_tokens=max_length if max_length else 2048 , do_sample=True , top_k=20 , top_p=top_p, temperature=temperature if temperature else 0.84 , repetition_penalty=1.15 , eos_token_id=2 , bos_token_id=1 ,pad_token_id=0 ) response = tokenizer.batch_decode(generate_ids, skip_special_tokens=True , clean_up_tokenization_spaces=False )[0 ] response = response.split("### Response:" )[-1 ] now = datetime.datetime.now() time = now.strftime("%Y-%m-%d %H:%M:%S" ) answer = { "response" : response, "status" : 200 , "time" : time } log = "[" + time + "] " + '", prompt:"' + prompt + '", response:"' + repr (response) + '"' print (log) torch_gc() return answer if __name__ == '__main__' : model = AutoModelForCausalLM.from_pretrained(model_path, device_map="cuda:0" , torch_dtype=torch.bfloat16, trust_remote_code=True ) tokenizer = AutoTokenizer.from_pretrained(model_path, use_fast=False , trust_remote_code=True ) model.eval () uvicorn.run(app, host='0.0.0.0' , port=api_port, workers=1 )
默认部署在 7871 端口,通过 POST 方法进行调用,可以使用curl调用,如下所示:
1 2 3 curl -X POST "http://127.0.0.1:7871" \ -H 'Content-Type: application/json' \ -d '{"prompt": "如何应对压力"}'
也可以使用python中的requests库进行调用,如下所示:
1 2 3 4 5 6 7 8 9 10 11 import requestsimport jsondef get_completion (prompt ): headers = {'Content-Type' : 'application/json' } data = {"prompt" : prompt} response = requests.post(url='http://127.0.0.1:7871' , headers=headers, data=json.dumps(data)) return response.json()['response' ] if __name__ == '__main__' : print (get_completion('你好如何应对压力' ))
得到的返回值如下所示:
1 2 3 4 5 { "response" :"寻求支持和放松,并采取积极的措施解决问题。" , "status" :200, "time" :"2024-01-12 01:43:37" }
Qwen 来自阿里云的Qwen,查看 https://github.com/QwenLM/Qwen
下载 Qwen 模型: https://huggingface.co/Qwen/Qwen-1_8B-Chat
可以使用git下载
1 2 git lfs install git clone https://huggingface.co/Qwen/Qwen-1_8B-Chat
或者使用huggingface的下载工具huggingface-cli
1 2 3 4 5 6 7 8 9 pip install -U huggingface_hub export HF_ENDPOINT="https://hf-mirror.com" $env :HF_ENDPOINT="https://hf-mirror.com" huggingface-cli download --resume-download Qwen/Qwen-1_8B-Chat --local-dir Qwen/Qwen-1_8B-Chat
Gemini-Pro 来自 Google 的 Gemini-Pro,了解更多请访问 https://deepmind.google/technologies/gemini/
请求 API 密钥: https://makersuite.google.com/
LLM 模型选择 在 app.py 文件中,轻松选择您需要的模型。
1 2 3 4 5 6 7 8 llm = Linly(mode='offline' , model_path="Linly-AI/Chinese-LLaMA-2-7B-hf" )
优化 一些优化:
使用固定的输入人脸图像,提前提取特征,避免每次读取
移除不必要的库,缩短总时间
只保存最终视频输出,不保存中间结果,提高性能
使用OpenCV生成最终视频,比mimwrite更快
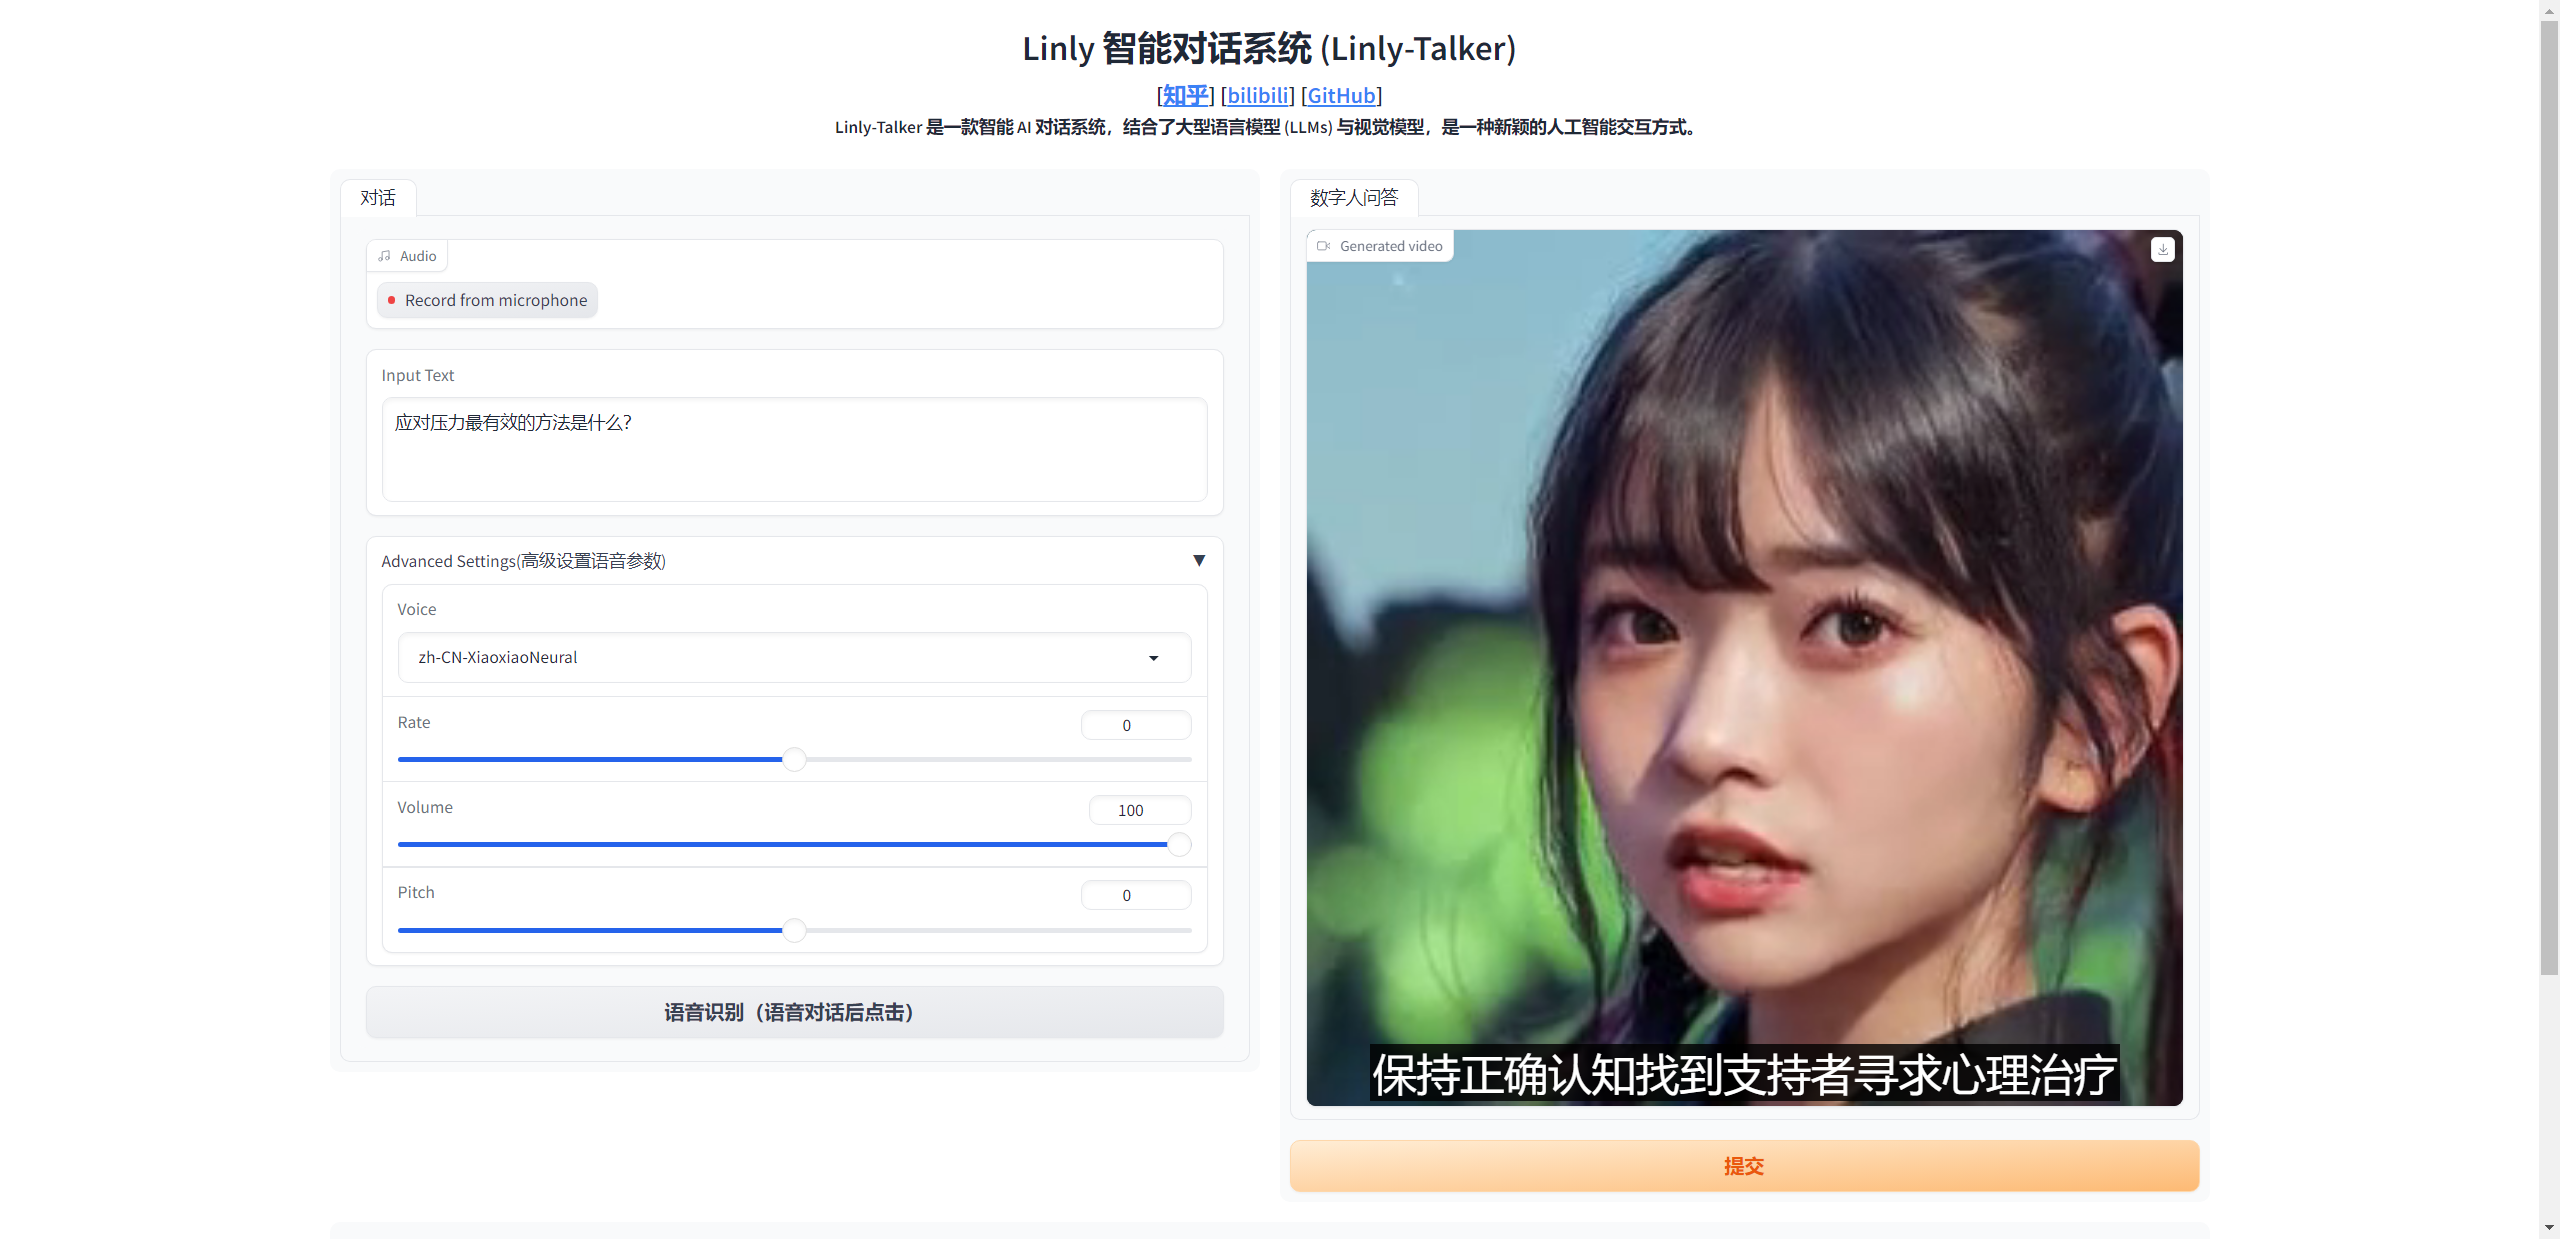
Gradio Gradio是一个Python库,提供了一种简单的方式将机器学习模型作为交互式Web应用程序来部署。
对Linly-Talker而言,使用Gradio有两个主要目的:
可视化与演示 :Gradio为模型提供一个简单的Web GUI,上传图片和文本后可以直观地看到结果。这是展示系统能力的有效方式。
用户交互 :Gradio的GUI可以作为前端,允许用户与Linly-Talker进行交互对话。用户可以上传自己的图片并输入问题,实时获取回答。这提供了更自然的语音交互方式。
具体来说,我们在app.py中创建了一个Gradio的Interface,接收图片和文本输入,调用函数生成回应视频,在GUI中显示出来。这样就实现了浏览器交互而不需要编写复杂的前端。
总之,Gradio为Linly-Talker提供了可视化和用户交互的接口,是展示系统功能和让最终用户使用系统的有效途径。
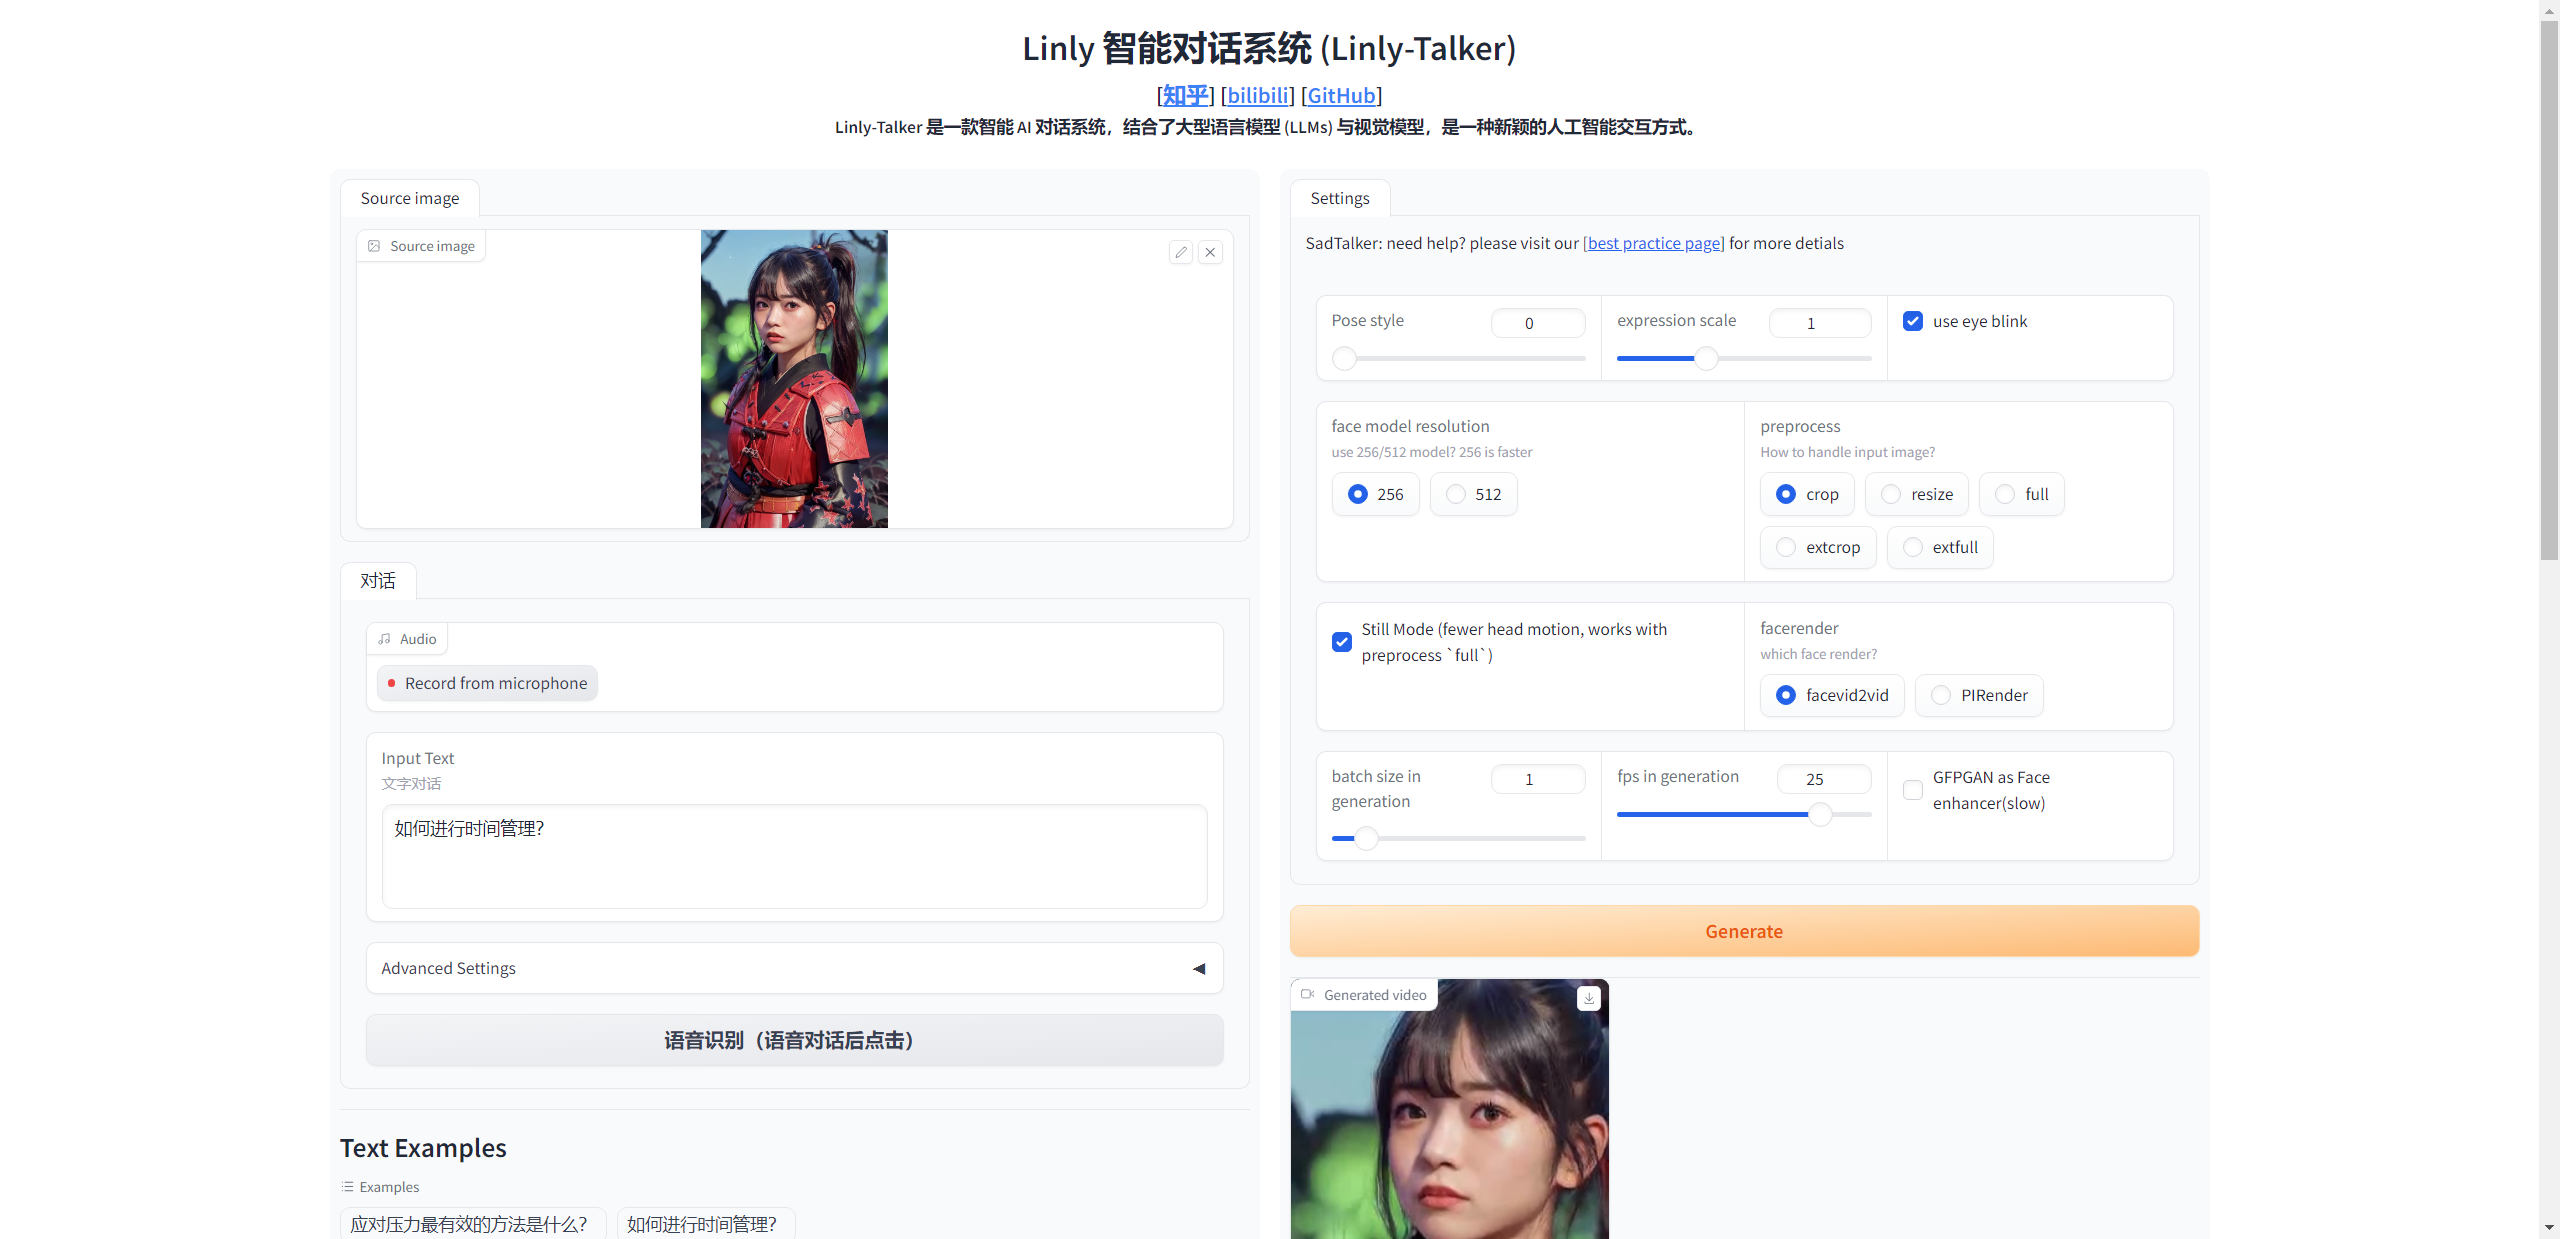
启动 现在的启动一共有几种模式,可以选择特定的场景进行设置
第一种只有固定了人物问答,设置好了人物,省去了预处理时间
第二种是可以任意上传图片进行对话
第三种是在第一种的基础上加入了大语言模型,加入了多轮的GPT对话
文件夹结构如下
权重部分可以从这下载:Baidu (百度云盘) (Password: linl)
1 2 3 4 5 6 7 8 9 10 11 12 13 14 15 16 17 18 19 20 21 22 23 24 25 26 27 28 29 30 31 32 33 34 35 36 37 38 39 40 41 42 43 44 45 46 47 48 49 50 51 52 53 54 55 56 57 58 59 60 61 62 63 64 65 66 67 68 69 70 71 72 73 74 75 76 77 78 79 80 81 82 83 84 85 86 87 88 89 90 91 92 93 94 95 96 97 98 99 Linly-Talker/ ├── app.py ├── app_img.py ├── utils.py ├── Linly-api.py ├── Linly-api-fast.py ├── Linly-example.ipynb ├── README.md ├── README_zh.md ├── request-Linly-api.py ├── requirements_app.txt ├── scripts │ └── download_models.sh ├── src │ ├── audio2exp_models │ ├── audio2pose_models │ ├── config │ ├── cost_time.py │ ├── face3d │ ├── facerender │ ├── generate_batch.py │ ├── generate_facerender_batch.py │ ├── Record.py │ ├── test_audio2coeff.py │ └── utils ├── inputs │ ├── example.png │ └── first_frame_dir │ ├── example_landmarks.txt │ ├── example.mat │ └── example.png ├── examples │ └── source_image │ ├── art_0.png │ ├── ...... │ └── sad.png ├── TFG │ ├── __init__.py │ ├── Wav2Lip.py │ └── SadTalker.py └── TTS │ ├── __init__.py │ ├── EdgeTTS.py │ └── TTS_app.py ├── ASR │ ├── __init__.py │ ├── FunASR.py │ └── Whisper.py ├── LLM │ ├── __init__.py │ ├── Gemini.py │ ├── Linly.py │ └── Qwen.py ....... // 以下是需要下载的权重路径(可选) ├── checkpoints // SadTalker 权重路径 │ ├── mapping_00109-model.pth.tar │ ├── mapping_00229-model.pth.tar │ ├── SadTalker_V0.0.2_256.safetensors │ └── SadTalker_V0.0.2_512.safetensors │ ├── lipsync_expert.pth │ ├── visual_quality_disc.pth │ ├── wav2lip_gan.pth │ └── wav2lip.pth // Wav2Lip 权重陆军 ├── gfpgan // GFPGAN 权重路径 │ └── weights │ ├── alignment_WFLW_4HG.pth │ └── detection_Resnet50_Final.pth ├── Linly-AI // Linly 权重路径 │ └── Chinese-LLaMA-2-7B-hf │ ├── config.json │ ├── generation_config.json │ ├── pytorch_model-00001-of-00002.bin │ ├── pytorch_model-00002-of-00002.bin │ ├── pytorch_model.bin.index.json │ ├── README.md │ ├── special_tokens_map.json │ ├── tokenizer_config.json │ └── tokenizer.model ├── Qwen // Qwen 权重路径 │ └── Qwen-1_8B-Chat │ ├── cache_autogptq_cuda_256.cpp │ ├── cache_autogptq_cuda_kernel_256.cu │ ├── config.json │ ├── configuration_qwen.py │ ├── cpp_kernels.py │ ├── examples │ │ └── react_prompt.md │ ├── generation_config.json │ ├── LICENSE │ ├── model-00001-of-00002.safetensors │ ├── model-00002-of-00002.safetensors │ ├── modeling_qwen.py │ ├── model.safetensors.index.json │ ├── NOTICE │ ├── qwen_generation_utils.py │ ├── qwen.tiktoken │ ├── README.md │ ├── tokenization_qwen.py │ └── tokenizer_config.json
参考
Star History